Showing posts with label cream. Show all posts
Showing posts with label cream. Show all posts
Friday, October 31, 2014
How to Make Danish Pancakes with Ice Cream and Fruit Sauce A Traditional Dansk Pandekage Recipe
When I was growing up my mother used to make Kale Soup then have Danish pancakes for dessert. As children we used to cling to our mother while constantly asking when the pandekager were done. Years later, if there is one thing our family still loves to eat is danske pandekager or Danish Pancakes.
Danish pancakes are very similar to crepes. However, traditional Danish pancakes are served as a dessert. Also, it appears that the Danish pancakes are bigger in size than the crepes and possibly a little sweeter too.

Danish pancakes are very similar to crepes. However, traditional Danish pancakes are served as a dessert. Also, it appears that the Danish pancakes are bigger in size than the crepes and possibly a little sweeter too.
Ingredients:
- 1 cup of all-purpose flour
- 2 teaspoons of sugar
- a pinch of salt
- 2 eggs
- 2 cups of milk
- European butter for frying
- grated lemon peel
- optional filling for the pancakes such as sugar, fruit or nutella
See our YouTube video to see how we made the Danish pancakes too!
Cooking Utensils:
- a whisk or a fork
- small bowl
- spatula
- grater
- a large non-stick frying pan
- measuring cups
- measuring spoons
Directions:
- Add all ingredients (except butter) into the bowl. Mix well until all clumps are gone.
- Let the batter sit in a large measuring cup for 20 to 30 minutes.
- Now you are ready to start frying pancakes! Add a bit of butter to a non-stick skillet and heat until medium warm.
- Tilt the pan approx 90 degrees and pour batter from the top. The batter will, run down and fill the pan from rim to rim. You can also pour the batter in the middle of the pan and quickly make circling motions to distribute the batter all over the pan. The goal is to have as thin a batter layer as possible.
- Cook until the pancake is a bit stiff. Before you flip the pancake be sure the pancake is firm on the edges.
- When ready flip over the pancake. You will see it is nice and golden brown. Cook the other side for another 1 minute. The pancake should be light brown on both sides.
- When ready, remove the Danish pancake from the frying pan.
- Repeat the steps until you have used up all of the batter.
 |
| The smell of danske pandekager on the pan is sure to attract everyone in the neighborhood. |
In Denmark, pandekager are normally served at kaffetid (coffee hour) at 3 p.m. Formally we usually have coffee or tea with the pancakes. If we have guests, we serve the pancakes on our Royal Copenhagen China and our Georg Jensen silverware.
Danske pandekager can be eaten in many ways. The traditional way is to eat Danish pancakes is to drizzle sugar or marmelade in the center of the pancake. Then roll up the pancake into a roll. My favorite way, albeit the messiest way is with vanilla ice cream and home made fruit sauce. Please see our blog and YouTube video (below) on how to make home made fruit sauce too!
Danske pandekager can be eaten in many ways. The traditional way is to eat Danish pancakes is to drizzle sugar or marmelade in the center of the pancake. Then roll up the pancake into a roll. My favorite way, albeit the messiest way is with vanilla ice cream and home made fruit sauce. Please see our blog and YouTube video (below) on how to make home made fruit sauce too!
A more modern way to eat Danish pancakes is with bananas and Nutella (Chocolate hazelnut spread). We never had Nutella with our pancakes growing up in Denmark. It is probably the last 10 or 15 years that eating Danish pancakes with Nutella is a popular choice too.
Filling ideas:
- fresh fruit - cut up strawberrys, bananas, blueberries, raspberries, etc
- jam or jelly
- sugar
- whipped cream
- Nutellla

Wednesday, October 8, 2014
Sour Cream Twists

I have a fairly predictable response to stressful life events. I become insomniac (because 5 am is always a good time to mull over your worries), I forget to eat, and I become surly and short-tempered with those who are only trying to help. I am well aware that these strategies could use a little work. But, on the somewhat more productive side of things, I do try to make some time to exercise and clear my head. And I bake.
Baking is perfect stress relief. Its mindless yet productive, helping pass the time while you wait for events outside of your control to unfold. Its comforting. Its delicious. And, as a bonus, you end up with a batch of cookies to, say, gratefully share with the surgical team who fit your dog in for a last-minute Saturday appointment. And really, how can things be bad in the world when there are cookies as perfectly delicious as these?
Ive been baking batches of rugelach lately, inspired by some time I spent at a local Jewish retirement home recording a recent audio project. And so, looking for a change of pace (yet still in possession of leftover sour cream), I came upon this recipe.
As best as I can tell, these cookies come from a long-ago Pilsbury bake-off (though some sources say the recipe was printed on a yeast package). Like rugelach, it starts by cutting butter into flour, then binding everything together with a plop of sour cream. But its also got an egg, for a bit of cookie-like structure, and yeast for a surprising bit of loft. After rising, the unsweetened dough is rolled out with vanilla sugar, folding in flaky, flavorful layers (which, as with rugelach, leaves sugar that caramelizes deliciously around the edges).
The resulting cookies are ridiculously addictive. Theyve got a bit of the feel of a sugar cookie, but with a softer lightness from the yeast and layers, a caramelized crispness around the edges, and a slight tang from the sour cream. Theyre rich yet airy, perfect for enjoying with a cup of tea or coffee, or setting out with a dish of those juicy little strawberries that have just come to market. If youre looking for a delicious way to process your anxiety (or just looking for a delicious treat to accompany your coffee break), these cookies are highly recommended.

Sour Cream Twists
adapted from what, if the internet is to be believed, are the Starlight Sugar Crisps from a long-ago Pilsbury Bake Off
yields 32 cookies
Dough:
1/4 cup room temperature water
1 package (2 1/4 teaspoons) active dry yeast
3 1/2 cups flour
1 1/2 teaspoons coarse salt
1 cup (2 sticks) cold unsalted butter, cut into pats
2 large eggs
1/2 cup sour cream
1 teaspoon vanilla extract
Sugar topping:
1 1/2 cups sugar (I tried both regular and coarse sugar, and they each worked nicely)
2 teaspoons vanilla extract
Pour the water in a medium bowl, and sprinkle in the yeast. Set aside for a few minutes to allow the yeast to soften and bloom.
In a large bowl or food processor, whisk or pulse together the flour and salt. Cut or pulse in the butter until particles are the size of peas (dont overwork!). If using the food processor, dump into a bowl at this point.
Whisk the eggs, sour cream, and 1 teaspoon vanilla into the yeast mixture until well combined. Pour this liquid into the flour mixture, and using your hands or a wooden spoon (and then your hands) mix until the flour has been moistened and the mixture forms a cohesive dough (you still want to see smears of butter — the mixture will be rolled out many times, so no need to overwork). Form the mixture into two equal portions, and cover the bowl (or transfer to a bag), and chill in the refrigerator for at least two hours (and up to four days).
When youre ready to bake, preheat the oven to 375º Fahrenheit. Remove the dough from the refrigerator, and line two cookie sheets with parchment. In a small bowl, combine sugar and 2 teaspoons vanilla, stirring well to combine.
On a clean counter top, sprinkle 1/2 of the vanilla sugar mixture. Take half the dough, place it on the vanilla sugar, and press it down. Flip the dough over, then roll out to a 16-inch x 8-inch rectangle (if needed, flip it again, or sprinkle sugar from the counter onto the top to keep the dough from sticking. Fold the sides into the center, like an envelope. Rotate 90º, and roll and fold again. Fold and rotate a third time, and roll out a final time into the 16-inch x 8-inch rectangle. All of the sugar should have been worked into the dough during this process.
Trim the edges of the rectangle, to neaten off the ends (and reveal the layers in the folds). Cut the rectangle through the middle, to form two 4-inch high rectangles, and then cut each one into 4-inch x 1-inch strips. Take each strip, twist twice, and place on the parchment-lined baking sheet, with a bit of space between them. You may need to press the ends of the cookies down to the sheet a bit to keep the fold (I found it easiest to shape the cookies, place them on the sheet, then then flip them all after I finished shaping the last one — maybe this is unnecessary, but it seemed to help them keep their shape).
Bake 15-20 minutes, until the cookies are light golden brown. Remove from the oven, and transfer immediately to a rack (before the caramelized sugar solders them to the sheet, or they darken too much. Repeat the entire process with the remaining dough.
These cookies are best within a day or so — theyre nice and crisp on the edges as soon as they cool from the oven, then soften a bit but are still delicious. If you want to keep them more than a few days, Id recommend freezing them.
Sunday, October 5, 2014
Smørrebrød Danish Open Face Pastrami Sandwich with home made Horseradish Cream Topping recipe
Our family loves the Danish open face pastrami sandwich. To give the pastrami sandwich a twist we make a homemade horseradish topping (peberrod sovs) for the sandwich. (Check out our easy homemade horseradish creamy topping recipe below!) While the combination of ingredients in this recipe may seem a bit odd, we assure you that the flavors are nice together!

There are a variety of Danish dishes that uses horseradish. Many Danish families have gardens and grow their own horseradish for their Danish dishes. Homegrown horseradish has a clear, fresh taste and packs more zing. If you decide to grow your own horseradish, youll be pleasantly surprised how easy it is to grow it. Horseradish is rank in the top five easiest-to-grow food plants, because it thrives in almost any condition. So, we look forward to having fresh horseradish each summer.
During the cold, dark winter months locally grown fresh produce can be pretty hard to come by. So, another alternative is to buy the horseradish in a jar at the grocery store. This is fine, but it does not have quiet the same characteristic taste as fresh summer horseradish. Our homemade Horseradish Cream Topping below uses the store bought horseradish in a jar. When we get closer to the summer months, we hope to go over how to grown and use fresh horseradish.
Depending how busy you are you can make everything the same day or over a 2 day period. We have included our YouTube video of how we made the Danish Open Face Pastrami Sandwich with home made Horseradish Cream Topping below.
First Step is to make the homemade Horseradish Cream Topping
Horseradish Cream Topping is very easy to make.
Horseradish Cream Topping Ingredients:
* 1 cup of fresh whip cream
* 2 - 3 tablespoons of horseradish from a jar
Kitchen Tools:
* Bowl
* Spoon
* Meauring Cup
* Hand mixer
First whip the cream until it is fluffy. Then add into the bowl two to three tablespoons of horseradish. If you like a stronger horseradish flavor, you can add more to taste. Mix the ingredients in the bowl with a spoon.
Please share and like our video. For more Scandinavian cooking videos please subscribe to our channel too! Thank you!
Second step is to make the Open Face Pastrami Sandwich with Horseradish Cream Topping
The Open Face Pastrami Sandwich is very easy to make. We either have this open face sandwich either for lunch, diner or part of a larger smørrebrød.
Ingredients:
* 2-3 slices of whole wheat bread (a rye bread is fine too)
* European style butter
* 3 or 4 pieces of pastrami
* horseradish cream topping
* parsley snippings
Instructions:
Spread on the whole wheat bread with butter. Layer the bread with either 3 or 4 pieces of pastrami across the bread. Add one or two tablespoons of Horseradish Cream Topping on the pastrami. Garnish with snippings of parsley. The parsley gives the open face sandwich extra color. You can add tomato slices of taste and color too.
The sandwich has to be eaten with a knife and fork too. The drink of choice is a good Danish beer! If you are having a formal Smorrebrod, we usually serve the open face sandwich on a Royal Copenhagen plate.
Smorrebrod Trivia: Did you know that in the 19thc. Denmarks Smørrebrød custom became popular & convenient. Over the years, smørrebrød developed into an art form with local food attractively presented.
We hope you enjoyed the video on how to make the Smørrebrød Danish Open Face Pastrami sandwich with our homemade horseradish topping video and recipe! If you like the video, please be sure to subscribe to our YouTube Channel Scandinavian Today. Our channel has videos including
*how to make Danish Christmas rice pudding with cherry sauce dessert recipe (Risalamande med kirsebærsauce)
*how to make Swedish Glogg for Christmas & cold evenings! (glögg or mulled wine recipe)
*how to make aeblskiver (æbleskiver)
*how to make Danish Christmas Klejner
*how to make easy Danish cucumber salad (arguksalat)
*how to make Danish sugar browned potatoes (brunede kartofler)
*how to make Danish red cabbage (rødkaal)
These recipes are perfect for the holiday season. Please let us know what you think! Glædelig Jul and Merry Christmas♥ !
Our Scandinavian recipes including Danish, Norwegian, Swedish and Finnish are on http://.blogspot.com/
Follow us either on Twitter @, Blogger, Google+, Google Pages, Pinterest and Subscribe to our YouTube Chanel Scandinavian Today! Lets get cooking Scandinavian foods!
Read more »
There are a variety of Danish dishes that uses horseradish. Many Danish families have gardens and grow their own horseradish for their Danish dishes. Homegrown horseradish has a clear, fresh taste and packs more zing. If you decide to grow your own horseradish, youll be pleasantly surprised how easy it is to grow it. Horseradish is rank in the top five easiest-to-grow food plants, because it thrives in almost any condition. So, we look forward to having fresh horseradish each summer.
During the cold, dark winter months locally grown fresh produce can be pretty hard to come by. So, another alternative is to buy the horseradish in a jar at the grocery store. This is fine, but it does not have quiet the same characteristic taste as fresh summer horseradish. Our homemade Horseradish Cream Topping below uses the store bought horseradish in a jar. When we get closer to the summer months, we hope to go over how to grown and use fresh horseradish.
Depending how busy you are you can make everything the same day or over a 2 day period. We have included our YouTube video of how we made the Danish Open Face Pastrami Sandwich with home made Horseradish Cream Topping below.
First Step is to make the homemade Horseradish Cream Topping
Horseradish Cream Topping is very easy to make.
Horseradish Cream Topping Ingredients:
* 1 cup of fresh whip cream
* 2 - 3 tablespoons of horseradish from a jar
Kitchen Tools:
* Bowl
* Spoon
* Meauring Cup
* Hand mixer
First whip the cream until it is fluffy. Then add into the bowl two to three tablespoons of horseradish. If you like a stronger horseradish flavor, you can add more to taste. Mix the ingredients in the bowl with a spoon.
Please share and like our video. For more Scandinavian cooking videos please subscribe to our channel too! Thank you!
Second step is to make the Open Face Pastrami Sandwich with Horseradish Cream Topping
The Open Face Pastrami Sandwich is very easy to make. We either have this open face sandwich either for lunch, diner or part of a larger smørrebrød.
Ingredients:
* 2-3 slices of whole wheat bread (a rye bread is fine too)
* European style butter
* 3 or 4 pieces of pastrami
* horseradish cream topping
* parsley snippings
Instructions:
Spread on the whole wheat bread with butter. Layer the bread with either 3 or 4 pieces of pastrami across the bread. Add one or two tablespoons of Horseradish Cream Topping on the pastrami. Garnish with snippings of parsley. The parsley gives the open face sandwich extra color. You can add tomato slices of taste and color too.
The sandwich has to be eaten with a knife and fork too. The drink of choice is a good Danish beer! If you are having a formal Smorrebrod, we usually serve the open face sandwich on a Royal Copenhagen plate.
Smorrebrod Trivia: Did you know that in the 19thc. Denmarks Smørrebrød custom became popular & convenient. Over the years, smørrebrød developed into an art form with local food attractively presented.
We hope you enjoyed the video on how to make the Smørrebrød Danish Open Face Pastrami sandwich with our homemade horseradish topping video and recipe! If you like the video, please be sure to subscribe to our YouTube Channel Scandinavian Today. Our channel has videos including
*how to make Danish Christmas rice pudding with cherry sauce dessert recipe (Risalamande med kirsebærsauce)
*how to make Swedish Glogg for Christmas & cold evenings! (glögg or mulled wine recipe)
*how to make aeblskiver (æbleskiver)
*how to make Danish Christmas Klejner
*how to make easy Danish cucumber salad (arguksalat)
*how to make Danish sugar browned potatoes (brunede kartofler)
*how to make Danish red cabbage (rødkaal)
These recipes are perfect for the holiday season. Please let us know what you think! Glædelig Jul and Merry Christmas♥ !
Our Scandinavian recipes including Danish, Norwegian, Swedish and Finnish are on http://.blogspot.com/
Follow us either on Twitter @, Blogger, Google+, Google Pages, Pinterest and Subscribe to our YouTube Chanel Scandinavian Today! Lets get cooking Scandinavian foods!
Tuesday, July 22, 2014
Vegan Chocolate Peanut Butter Cream Pie

If you spend time in certain circles (those of the vegan persuasion), at some point someone will try to get you to eat a foul-sounding "pie" made of melted chocolate chips and tofu. This friend will assure you that it is phenomenal, that it tastes just like a chocolate silk pie, and has none of that nasty soy aftertaste. This person will be wrong on all counts.
But there is a way to make a delicious vegan chocolate pie that tastes good. And I dont mean "good by vegan standards" -- I mean "good." Like this pie. Seriously, look at it. Dont you want a bite?
This pie follows the basic chocolate cream pie template, using the solid-at-room-temperature cocoa butter of chocolate to stabilize an airy whipped topping (I used a commercial vegan cream replacement that whips up like cream, but only because my dining companion balked at the delicious saturated fat of coconut cream -- you can substitute that instead for a slightly denser but perhaps more delicious result). I added a layer of smooth peanut butter-coconut cream filling as well (because isnt every chocolate dessert better with peanut butter?), and poured it into an almond meal crust (though you can easily use your favorite cookie crumb crust instead). And to gild the lily I topped everything with the salty-sweet snap of candied peanuts.
And if this isnt enough sweetness for you, you can check out my story on the almond-and-cream deliciousness of Swedish Shrove Tuesday semlor over at NPR. Its a lovely practice, but truth be told I think this vegan pie might be even more delicious. I know, who am I these days?
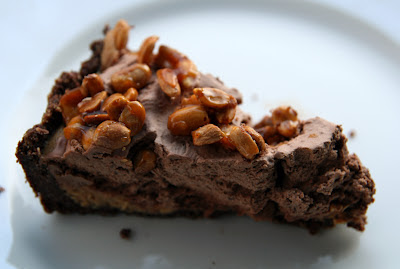
Vegan Chocolate Peanut Butter Cream Pie
serves ~8-10, depending on level of enthusiasm
Crust and chocolate filling inspired by BitterSweet, peanut butter filling freestyled, candied peanuts adapted from David Lebovitz
Candied Peanuts:
this yields slightly more than youll need, but its hard to stop eating them so thats probably for the best
1/2 cup sugar
1/4 cup water
1 cup dry-roasted peanuts
hefty pinch coarse salt
Crust:
1 1/2 cups almond meal
3 Tbsp cocoa powder
2 Tbsp sugar
3 Tbsp melted margarine
Peanut Butter Layer:
1/2 cup smooth peanut butter
1/3 cup coconut cream (the thick solid layer on top of a can of coconut milk)
2 Tbsp maple syrup or corn syrup, or sugar to taste
splash vanilla
hefty pinch salt
Chocolate Layer:
12 ounces bittersweet or semisweet chocolate, chopped to bits (or chocolate chips)
10 ounce package whippable vegan cream (I used this)
2 Tbsp corn syrup (optional, but gives it a nice gloss)
To make the candied peanuts: Have a cookie sheet at the ready. Mix the sugar and water in a medium skillet over a medium-high flame, until the sugar melts and dissolves. Add the peanuts and salt, and cook, stirring regularly, until the sugar mixture begins to darken (often the mixture turns sandy before it re-melts and darkens, which is totally normal but this last time I added a bit more water and it didnt - I gave the recipe here as I made it, but dont worry if the sandy stage happens to you -- it will remelt). Turn the peanuts constantly with a heat-proof spatula as this happens, until the sugar is darkly-colored but not burnt (caution: this is a narrow window). Turn the peanuts out onto the cookie sheet, breaking them up into clumps if you can (if theyre too hot or the sugar is trailing into whisps as you try, just wait until theyve cooled and hardened and you can do it then). Set aside.
To make the crust: Preheat your oven to 350 degrees.
Mix together the almond meal, cocoa powder, and sugar. Add the melted margarine, stirring to combine, and press the mixture into a 9" tart pan. The mixture will make a very thin layer -- this makes it a bit difficult to evenly distribute, but makes for a lovely end result. Bake ~10 minutes, until it colors very slightly. Set aside to cool.
To make the peanut butter filling: Whip together all of the filling ingredients until smooth. Taste and adjust as needed. Pour into your baked and cooled pie shell.
To make the chocolate filling and finish the pie: In a microwave or over a double-boiler, melt the chocolate (dont over-cook!), and allow to cool just slightly. Stir in the corn syrup.
Whip the cream for 2-3 minutes, until light and fluffy and tripled in volume. Take a dollop of the whipped cream and stir it into the chocolate mixture to lighten, then gently fold the lightened chocolate into the cream. Gently spread the chocolate on top of the peanut butter filling. Chill the pie for several hours to set, then sprinkle with the candied peanuts and serve.
Monday, July 21, 2014
Chocolate Juniper Cake with Milk Jam Sour Cream

I tend get my hackles up over use of the word "special." It so often smacks of faint praise, or overcompensation. Its possible Im a bit of a hater. But recently my friend Brian helped me come around. As good friends and neighbors, we end up eating a lot of meals together (and sharing too-good-not-to-bring-next-door bites of many more). And there have been times during these meals where hell just pause, savoring everything about a singular mouthful, and then pronounce it special.
Maybe its the fact that Brians a particularly dear friend, or the total wide-eyed sincerity with which he shares this reaction. Whatever it is, its helped me get over my surliness and embrace the word. Because hes right. Some things truly are special. Like this cake.
I first saw this cake posted on Bon Appetit, and figured that it was the sort of thing best left to the professionals. But then I saw it on a beloved blog, and thought perhaps it was within the mortal realm. And then I made it, and I shared it with my neighbors, and we moaned out some expletives about how holy crap good it was.
Amazingly, its not even all that complicated. The cake itself is just a simple two-bowl chocolate cake — you dont even have to remember to soften butter or anything. But there are a few simple steps that take it beyond. First off, the cake is scented with juniper berries (thankfully sold in bulk at the local natural market down the street), which manage to both deepen and cut through the chocolate with their unique woodsy vibe. Then you make a sauce that manages to be both milky-sweet and rich and tangy at the same time. And then — even better — you firm up the cake in the freezer, dredge it in sugar, and give it a quick pan-fry to yield a delicately caramelized crust. The end result makes you question all of your previous cake-making. Why isnt chocolate always paired with juniper? And milk jam sour cream served on everything? And seriously why isnt every cake caramelized prior to serving? None of these tweaks is all that difficult, and all are within the grasp of pretty much any cake-baking home cook. And the end result is really, really special.
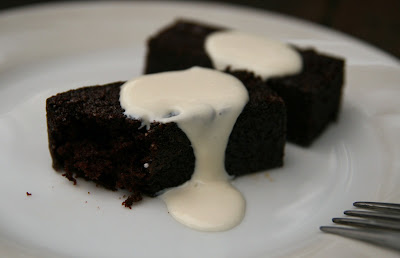
Chocolate Juniper Cake with Milk Jam Sour Cream
adapted from Oxheart, via Bon Appetit
serves ~10 (you can also halve the recipe and bake in an 8-inch pan instead)
Cake:
2 heaping teaspoons juniper berries
1 3/4 cups flour
1 2/3 cup sugar (plus more for caramelizing the cake)
1/2 cup plus 1 Tbsp cocoa powder
2 tsp coarse salt
1 1/2 tsp baking soda
3/4 cup buttermilk (if unavailable, substitute soured milk)
3/4 cup neutral oil, like vegetable or grapeseed
2 large eggs
Milk Jam Sour Cream:
1 cup sour cream or creme fraiche
1-2 Tbsp sweetened condensed milk (if youd like to make your own milk jam, boil down 2 cups milk with 1 cup sugar until youre left with a darkened, sweetened cup, ~45 minutes — and, as a bonus, leftover milk jam or sweetened condensed milk keeps for a while and is great stirred into your coffee)
To make the cake: Preheat your oven to 350° Farenheit. Grease a 9x13 pan, line the bottom with parchment and grease again, then dust everything with flour. Set aside.
Heat a dry skillet over a medium heat, then dry-toast the juniper berries until they become oily and fragrant (this will barely take a minute). Let cool slightly, then grind in a spice grinder.
In a large bowl, sift together the ground juniper berries with the flour, sugar, cocoa powder, salt, and baking soda. In a separate bowl, whisk together the buttermilk, oil and eggs until well combined. Pour the wet ingredients into the dry, and fold or whisk until just combined (dont over-mix). Quickly transfer to your prepared pan, smooth the top if needed, and bake until a tester comes out clean, ~35-40 minutes. Remove from the oven, let cool, then transfer to the freezer until solid, at least two hours and up to three weeks (if the latter, wrap well in plastic).
To make the milk jam sour cream: Stir the sweetened condensed milk or milk jam into the creme fraiche/sour cream to taste — you want something thats lightly sweet, but still quite tangy.
To finish the cake: Remove the cake from the freezer, turn out onto a cutting board and discard the parchment. Trim off the edges, then slice the cake down the middle, so that you have two rectangles of about 4-inches in height, then slice each rectangle crosswise into 1 1/4-inch bars.
Pour out some granulated sugar onto a plate, grab a pair of tongs if youve got them, and heat a pan over a medium heat (the recipe recommends nonstick, but I did this with a regular steel pan and it was fine). Roll each cake bar in the sugar, so that theyre well-coated with a thin-yet-thorough dusting. Working in batches, transfer the cake slices to the skillet. Let caramelize on each side, turning to expose the next side when the side in the pan has melted and caramelized (once your pan is hot, itll take less than 30 seconds per side). You can also caramelize the short ends if you are quite obsessive, but its not necessary. Serve straight from the pan, with a dollop of milk jam ladled over the top.
Wednesday, May 14, 2014
How to Make Rum Sauce for Desserts and for Flavored Whipped Cream Bread Pudding
Rum Sauce is perfect over ice cream, custard, cake and bread pudding. Here is my version of rum sauce. Enjoy!
Ingredients
- 1 cup brown sugar
- 1/2 cup (1 stick) butter
- 1 teaspoon of cinnamon
- 1/2 cup of heavy cream
- 2 tablespoon of rum or to taste
Kitchen Utensila
- meausring cup
- medium saucepan
- whisk
- measuring spoon
Instructions
In a saucepan, melt butter and brown sugar over medium heat. Whisk to blend well until the sugar is melted.
Once the mixture is melted then add the cinnamon and cream. Cook over low heat, stirring constantly, until mixture thickens. (Do not allow to simmer, or it may curdle.)
Keep stirring. Finally add two tablespoons of rum, cook this for about 5 minutes on low heat. Keep stirring. If it is turn to thick add a little cream or milk to thin it out. If you like more rum flavor add more to taste. Remove from heat.
Whisk before serving. The sauce should be soft, creamy, and smooth.
Can you put it on ice cream. Pour over bread pudding. Serve warm or cold.
Friday, May 9, 2014
Goat Cheese Cream with Berries

A few years ago, I was cooking with a friend on a Sunday afternoon, making several dishes to leave us with leftovers for the week ahead. We were debating what to make for dessert, as a possible surprise for her husband. Somehow we hit upon the idea that it would be funny if dessert were, for no real reason, a fully iced layer cake. And so we baked and frosted one, and presented it with much fanfare and giggling.
I love the idea that any random weeknight dinner can easily turn into a celebration. While we dont always have time to construct an iced cake, there are several little turns that you can easily take, quickly turning any dinner into an occasion. Especially when you have some delicious berries to work with.
To be clear, I think berries are a celebration in and of themselves. But with just a few easy accompaniments, they can be so much more. Whether its honey-sweet Greek yogurt (like at last weeks delicious lunch club), a shortcake biscuit, or a blob of barely-sweetened whipped cream, the ordinary can become festive. Recently I rounded up a few quick berry-friendly desserts, from busy-day cake to a blitz-in-the-blender clafouti. But my favorite is this goat cheese cream, where a soft block of chevre is melted into a cheesecake-like custard sauce. Paired with a compote or fresh berries, its a celebration of the season (or of whatever else youre looking to celebrate). You can find all of these recipes over at The Oregonian.

Thursday, May 8, 2014
How to Make Danish Medal Cookies With A Pastry Cream Filling Medaljer Kage Opskrift
These cream cakes (Medaljer) are very common in Danish bakeries and homes. These are made in countless variations. The primary ingredients are the cookies, custard, whipped cream, and icing. Below is the recipe for each of the primary ingredients. Once each item is made it just requires assembling to make a delicious treat. First step is make the cookie
Cookie Ingredients:
- 1 1/4 cups of flour
- 3 tablespoons of powdered sugar
- 1 egg
- 5 tablespoons of softened butter
- bowl wooden spoon
- pastry blender
- measuring cup
- rolling pin
- baking tray
- parchment paper
Cookie Preparation
Combine sifted confectionery sugar and flour in a large mixing bowl. Mix well by hand or with a wooden spoon. Add softened butter and knead with either a wooden spoon or a pastry blender. Next add one egg and mix the mixture with a wooden spoon Continue mixing the dough. Use your hands to form a smooth round ball of dough. Wrap in plastic wrap and chill in the refrigerator for one hour.
Preheat oven at 400F. Roll dough on lightly floured work surface to 1/4 or 1/8" thickness. Cut into round cookie shapes with medium-sized wineglass or a cookie cutter. Bake on a greased baking sheet or lined with parchment paper for about 8 minutes or until pale golden brown. Place on the center of the oven rack and bake at 4oo degrees
Remove to a wire rack to cool. Can be kept in an airtight container until needed.
Custard As a Pastry Cream for the Medal Cookies - Creme budding opskrift
Custard Ingredients:
- 2 cups of milk
- 2/3 cups of flour
- 2 eggs
- 3/4 cup of sugar
- 1 teaspoon of vanilla
- 1 tablespoon of butter
- pinch of salt
- kitchen pot
- large bowl
- measuring cup
- wooden spoon
Custard Preparation
Heat milk over the stove at medium heat. Do not boil the milk. Combine sugar, flour, salt and the two eggs in a bowl Mix the mixture in the bowl. Add a little of the egg-sugar-flour mixture to the warm pot of milk that is on the stove. Pour a little more of the mixture into the warm milk, stirring constantly. Stir constantly to avoid the custard becoming lumpy and to prevent it from burning. When the custard has thickened pour it into a bowl. Next add the butter and stir it into the warn mixture. Then add vanilla into the milk mixture. You dont want the vanilla to boil. So the vanilla should be added last.
Cover over the bowl of custard with plastic wrap. Place the bowl in the fridge at least two hours. You can sprinkle sugar over the custard while cooling so that a skin will not form too. Cool custard completely in the refrigerator - a minimum of 2 hours.
Icing Ingredients:
- 1 cup of confectionary sugar
- a glass of water
- almond flavoring (optional)
- food coloring (optional)
Kitchen utensils
- bowl
- spoon
- measuring cup
Sift powdered sugar into a bowl. Add a couple of tablespoons of water into the sugar. Stir until a smooth mass is obtained. If need be, add a couple more drops of water. Optional add flavoring or food coloring. Color and taste can be varied by mixing in lemon flavoring, cocoa. etc.
Assembly:
When the cookies and the custard are cool, we are ready to assemble all of the primary ingredients.
Choose half of the nice cookies to be the tops. Glaze half of the cookies with the sugar icing using a knife. Let the glaze stiffen.
Next on the other cookie use a pastry bag to pipe out whipped cream to create a circular boarder or a ring on the edge of each cookie. Fill the center of the cookie with the custard using a spoon. The whipped cream ring holds the custard in.
Place the glazed cookie glazed side up on top of the custard. Garnish with a dab of whipped cream over the glazed cookie. Add a fresh fruit such as strawberries or blueberries on top.
Refrigerate until serving. Serve the same day !
Subscribe to:
Posts (Atom)