Showing posts with label aka. Show all posts
Showing posts with label aka. Show all posts
Friday, September 12, 2014
Korova Cookies aka World Peace Cookies gluten free

I dont usually do that much gluten-free baking. But for world peace, I make an exception.
Recently the lovely blog Gluten-Free Girl and the Chef posted something of a road map of the journey you take in gluten-free baking (and gluten-free living). Living gluten-free is about learning the ins and outs of a whole new palette of starches. And its a hefty palette -- different gluten-free starches have different properties, so if you want something that binds, aerates, flakes, and all that good stuff, youre going to have to combine a variety of ingredients and techniques. I dont have too much experience with the gluten-free pantry pantheon, so when I want to bake for gluten-free friends, I usually turn to tried-and-true recipes, and follow them exactly.
But last week, Gluten-Free Girl and the Chef threw down the gauntlet. Well, the friendly, collaborative sort of gauntlet. After an uncharacteristically spectacular recipe failure, they solicited feedback in developing a gluten-free version of Korova Cookies, also known as World Peace Cookies. Their version turned into a melty mess on the cookie sheet, and so they asked for thoughts, comments and suggestions as to how to come up with a dough that more closely resembled its inspiration.
The cookies in question are a chocolatey-salty version of buttery sablés. These French cookies are so named for their sandy texture, sort of like a crumbly shortbread. In this version, developed by the failsafe Dorie Greenspan, theyre given a shot of cocoa powder, some chopped chocolate and a hefty dose of salt, and according to her neighbor they might just be the secret to world peace. Who could say no?
As any gluten-free baker knows, developing a crumbly texture isnt usually much of a problem. I turned to the somewhat nubbly rice flour as the main ingredient, with some tapioca starch and sorghum along too, and a teensy bit of xanthan gum to bind (this ingredient can be found at most health food stores, but can also be easily obtained from any of your gluten-free friends in exchange for the promise of cookies). Gluten-free sablés need a bit of structure to stand up to all that butter, but not at the expense of their crumbly short texture. I turned to egg yolks, removed from their more structurally-solid whites. I also swapped out some of the butter for an ingredient that may seem strange: hard-boiled egg yolks.
I first saw hard-boiled yolks used in a strawberry shortcake recipe last summer, and it turns out that theyre not all that uncommon, and are even used in some traditional sablé recipes. They lend a delicious richness, but without the water content and binding properties of raw yolks, or the melting potential of butter. I was aiming to try a few variations, but after a spectacular cookie disaster of my own (more on that later), I was pretty cookied out, and just made the one. But the gluten-free gods seem to have smiled, because it was indeed the one. Chocolatey and salty (in a way that seems to deepen the chocolate flavor), with a delicate texture. World peace to follow? We can only hope.

Korova Cookies (aka World Peace Cookies), gluten-free
adapted from the World Peace Cookies in Dorie Greenspans Baking: From My Home to Yours, inspired and informed by Gluten-Free Girl and the Chef
yields ~28 cookies
1/2 cup rice flour
1/3 cup sorghum flour
1/3 cup tapioca starch
1/3 cup cocoa powder
1/2 tsp baking soda
1/2 tsp xanthan gum
1 stick butter, softened to room temperature
2/3 cup brown sugar
1/4 cup sugar
1/2 tsp coarse salt (fleur de sel if youve got it, kosher salt if youre me), or a heaping 1/4 tsp regular salt
1 tsp vanilla extract
2 hard-boiled egg yolks
2 raw egg yolks
1/2 cup chopped chocolate, or 3/4 cup mini chips (if using the latter, chop a few up into scraps, to get those little bits that will melt into the batter and make it all the better)
Sift together the rice flour, sorghum flour, tapioca starch, cocoa powder, baking soda, and xanthan gum. Set aside.
In a mixer, cream together the butter with the brown sugar and sugar until theyre light and fluffy. Add the salt, vanilla, and crumble in the hard-boiled egg yolks. If youre mixing by hand, you may want to pass the yolks through a seive to make sure they are broken up into small pieces, but with a mixer and the granular sugar, you should be fine. Mix another minute or two, until the mixture is well-combined and fluffy. Add the raw yolks, and stir until just combined.
Add your dry ingredients, mixing until they are completely incorporated. Mix in the chopped chocolate until it is evenly dispersed. Lay out a piece of plastic wrap or waxed or parchment paper (or, if youre me, a cut-open plastic bag because you dont seem to have either of the other items). Take half the dough, shape it into a chubby sausage with a 1 1/2" diameter, and wrap it tightly in your covering of choice. Repeat with the remaining dough. Refrigerate overnight.
The next day, preheat your oven to 325 degrees farenheit. Line two baking sheets with parchment or silicone mats, if youve got them (or else just grease them well and hope for the best).
Take out one of your dough tubes, and slice the cookies into hefty 1/4" discs (I might have been closer to 1/3"). Set the rounds of dough onto one of the prepared sheets, leaving a few inches between (they will spread). Bake 12 minutes -- the cookies should be set enough to have something of a crust, but they will not be close to being firm or done. Remove, and let cool on the sheets. Repeat with remaining disc. The cookies will remain slightly soft when warm, but firm up upon cooling. Theyre delicious either way.

Saturday, September 6, 2014
Baby Shower Cookies aka Sugar Cookies with Royal Icing

There comes a time in life when it seems like almost everyone you know is having babies. At first, it kind of floors you every time you hear the news, and you struggle to come up with a gift commensurate to the occasion. In years past, I crafted ornate homemade cards, cooked obscene amounts of food, and stitched patchwork quilts and a stuffed pink satin armadillo. But as more and more friends began to have babies, I realized that keeping up with that sort of gifting protocol could quickly become a second job. I started turning to the gift registry, pairing a cotton onesie with a heartfelt card and calling it a day. For the most part, this seems appropriate. But every now and then, I hear about the pregnancy of a friend who is so dear that the registry just doesnt cut it. I start looking around for a more personal way to share the love. And recently, I hit upon these baby shower cookies.
Having never made gingerbread houses as a kid, I was pretty new to the world of royal icing. This sweet-yet-structural topping combines powdered sugar with egg whites or meringue powder, and is versatile enough to pipe intricate designs yet sturdy enough to be shipped across the country in a pre-baby care package. And its fun. Arts and crafts such as these are sadly in short supply in adulthood. Although my own journey with these cookies took three attempts (due to some boneheaded mistakes on my part that are too embarrassing to detail, namely refusal to read ingredient listings and refusal to use a timer), theyre really not that hard. I piped my royal icing with a pastry cone I taped out of scratch paper, and although the resulting designs are somewhat "rustic," nobody complained. The hardest part of the whole process is the waiting, from chilling the cookies to letting the icing set. Its one of the sweetest ways Ive come up with to welcome the good news.


Baby Shower Cookies
Cookies adapted from Martha Stewarts Classic Sugar Cookies, icing and technique from Not So Humble Pie blog, tasteless decoration idea all my own.
yields ~2 dozen cookies, depending on the size
Meringue powder generally requires a trip to a cake or craft shop, but carries less salmonella danger than egg whites, so its worth seeking out for the pregnant set. It also costs much more than you think powdered egg whites rightfully should, but generally comes in packages that are large enough for several batches. And once you learn how to make these cookies, you might find it hard to stop.
Cookies:
2 cups flour
1/2 tsp baking powder
1/4 tsp salt
1 stick butter, softened to room temperature
1 cup sugar
1 large egg
1 tsp vanilla extract
Icing:
1/2 lb powdered sugar
2 1/2 Tbsp meringue powder
2 Tbsp + 2 tsp water
splash vanilla, if desired
food coloring
To make the cookies:
Sift together the flour, baking soda, and salt. Set aside.
In a mixer with a paddle attachment, beat together the butter and sugar until fluffy. Add the egg and vanilla, mixing until well combined. Add the flour mixture, and stir until the dough comes together. Shape the dough into a chubby disk, cover in plastic or waxed paper, and let chill in the refrigerator until firm (at least an hour, though you can easily let it sit overnight).
When the dough is chilled, remove it from the refrigerator and let sit at room temperature for a few minutes, until soft enough to roll. Roll out on a floured surface to 1/4" thickness, and cut out your desired shapes (I used a 2.5" round cutter (or, more accurately, glass jar), which yielded cookies that fit perfectly inside a wide-mouth canning pint jar for shipping). Mush together scraps, re-roll and cut again, and repeat until all the dough is used.
Now to freeze the cookies, so that they bake evenly and provide you a smooth, non-domed icing surface: take an 8" brownie pan, line it with plastic, and place a layer of cookies in it. Repeat with more plastic and more cookies, until theyre all in. Make sure theyre laying flat. Place in the freezer until very firm, least 20 minutes.
While the cookies are chilling, preheat the oven to 325 degrees. Place the frozen cookies on prepared cookie sheets, and bake until the edges are golden, 15-18 minutes. Let cool on racks.
To ice the cookies:
In a mixer with a paddle attachment (a whisk incorporates too much air), beat together the powdered sugar, meringue powder, water and vanilla for 5 minutes. Divide the icing into bowls, and tint with food coloring until it reaches your desired shade. Add additional water until it reaches the desired consistency: if you lift up the icing and let it drizzle back from a spoon, it should be firm enough that it holds the shape of the drizzle for at least 5 seconds, but liquid enough that its totally disappeared by 10 seconds.
To ice cookies, you probably want to look at some good tutorials, such as this or this, and pipe a few practice designs on a plate before you attack the cookies. But basically, you want to put your icing into a pastry bag/makeshift paper cone, and pipe out the outline on your cookie. Let this dry for 10 minutes, and then add a bit more water to thin your icing so that you can "flood" the cookie inside the outline with some spooned-in thinned icing. Neat! You might need to poke the icing with a toothpick or skewer to guide it to the very edge of your outline. Let this base layer dry another 10 minutes.
Using another pastry bag/paper cone, pipe on decorations as you choose. If youre using multiple colors next to each other, allow another 10 minute drying session in between colors, so that they dont bleed. Allow the finished cookies to dry for several hours, preferably overnight, then pack them in a tin and send them on their way.
Friday, September 5, 2014
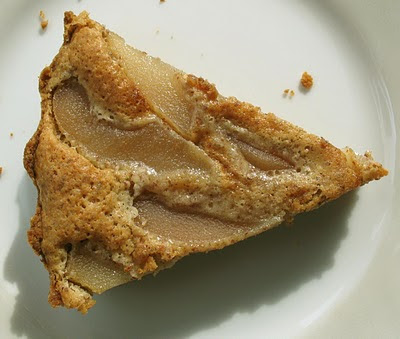
Ordered Pear Pie aka Pear Frangipane Tart
Few people know this, but I happen to have been Fox Lane High Schools Biology Student of the Year for 1991. Its not a fact I bust out all the time -- I dont want friends to feel inadequate about their own lack of two-decades-old scientific achievement -- but it represents a small yet significant part of me. I also subscribed to Ranger Rick magazine all through my formative years, and recently took an Anatomy & Physiology class for kicks. Which is all to say that beneath this unassuming exterior beats the heart of a science nerd. So when I heard about the practice of Pi Day, wherein scientists and bakers come together for a deliciously pun-tastic day of pastry on March 14th (Get it - 3.14?), I couldnt resist.
Sandwiched between the heavy pumpkin pies of winter and the first berry tarts of spring, March isnt usually prime pie season. In fact, pretty much the only fruit in season near me is canned fruit. Luckily, Ive got that in spades.
And, because I cant leave well enough alone, I needed to add my own groan-inducing science-themed "humor" to the occasion. I dug up a quart of lightly-spiced canned pears from last fall, which led to thoughts about mathematical pairs. Namely, ordered pairs. Last fall I played around with a pear frangipane tart, with a splay of poached pears pinwheeling on top of a cushion of marzipan-like almond frangipane custard. While my pears dont have the standardized mappable coordinates of classic ordered pairs, they do feature a precise fractal-like placement and beauty (at least until the frangipane puffs around them -- you can go with a thicker frangipane or fewer pears if you want the ordered placement to stand out, but I tend to err on the side of tenderness and lots of fruit).
Some sticklers will argue that with its crumbly-not-flaky patee sucre short crust and straight-sided pan, this would be more accurately described as a tart than a pie. But as its been noted, they are close enough cousins. And Pi Day is not about divisions -- its about bringing us together around a love of math. And pie.

Pear Frangipane Tart (aka Ordered Pair Pie)
adapted from the Pear and Almond Frangipane Tart in Dorie Greenspans Baking: From my Home to Yours (is there anything that book cant do?) with further crust-tweaking from Smitten Kitchen
I used a quart of canned pears, probably about 3-4 pears worth. You can used canned pears, or poach your own using the instructions on this recipe. Four pears is a pretty pear-heavy dessert -- if youd like it to be a bit more like a traditional dessert, use two pears, and make half again as much frangipane (otherwise youll have a gap of empty crust).
Crust:
1 1/2 cups flour
1/2 cup powdered sugar
1/4 teaspoon salt
1 stick plus 1 tablespoon (9 tablespoons; 4 1/2 ounces) very cold unsalted butter, cut into small pieces1 egg
Filling and Finishing:
6 Tbsp unsalted butter, softened to room temperature
2/3 cup sugar
3/4 cup ground almonds
1/4 tsp salt
2 tsp flour
1 tsp cornstarch
1 egg + 1 egg white
1 tsp vanilla extract1 1/2 tsp almond extract
~3 canned pears, sliced in whatever fashion you find prettiest
To make the crust:
In a food processor, pulse together the flour, sugar and salt. Add the butter, and pulse until oatmeal-sized pebbles form. Add the egg, and pulse until it just starts to come together (do not over-mix). Turn the dough into a bowl or lightly-floured work surface, and knead until it finishes coming together and seems uniformly moistened. Shape into a chubby disk, cover in plastic, and chill for ~2 hours.
Remove the chilled dough from the refrigerator, and allow to soften for ~5-10 minutes, until roll-able. Place between sheets of plastic, parchment or waxed paper, and roll out until it forms a circle large enough for your tart pan. Press into a greased pan, and pierce (aka "dock") with a fork in a few places. If your tart pan is metal, throw it in the freezer for half an hour. If your tart pan is ceramic, and you dont want it to shatter from going from freezer to oven, toss it back in the fridge. Preheat the oven to 375 degrees.
To make frangipane and finish the pie:
Reduce the oven temperature to 350 degrees.
Combine the butter, sugar, almond meal and salt in a food processor. Pulse to combine. Sprinkle in the flour and cornstarch, pulse, then add the egg and egg white and extracts, and process again until very smooth.
Spread the frangipane gently on the cooled crust, and arrange the pears on top in any fashion you like (ordered or not). Bake until the frangipane puffs and turns golden, and feels firm to the touch, ~45-50 minutes. Allow to cool slightly before serving.

Wednesday, June 18, 2014
Macaroons with Chocolate Ganache and Almonds aka Almond Joy Cookies

I recently received a package from a friend who is traveling in Africa. The brightly-colored fabric-backed painting was lovely, but honestly I was probably just as thrilled by the basic fact of the envelope as by its contents. Care package! Foreign stamps! Hand-written letter! Getting mail is so exciting!
These days, its possible to go years without receiving a little homemade postal love. Unless youre sharing grocery lists, you might not know what someones handwriting even looks like. Theres the mass-produced holiday card, or the wedding thank-yous written out by the dozens, but honestly its not the same. A care package, lovingly assembled in another city and posted out to you, is such a thrill. I give and receive them all too infrequently.
But when I do, the question remains: what to send? The shelf-stable particulars vary based upon the recipient, but Im almost always looking to include a little handmade sugar as well. Unfortunately, it can be hard to find the right cookies to send. Chocolate chip cookies and brownies are great fresh from the oven, but unless youre a starving college student, youre probably not going to want them six days later. Things like gingerbread or biscotti, dried out to a long-term-storage crisp, work well. But recently I pulled together a package for someone in need of a little pick-me-up, and demure crunchy tea cookies werent going to do. I wanted something a little more gooey, more chocolatey and indulgent, but still delicious after spending the better part of a week in transit. Fortunately, I discovered these macaroons.
This recipe produces a showstoppingly good cookie. Fresh out of the oven, youre struck by the moist, rich coconut filling, gently toasted to a crisp on the outside. And to make matters even better, this richness is offset by a bittersweet fudgey ganache. I was compelled to take it even further, adding a sprinkling of toasted almonds, and the lightest dusting of coarse salt to bring out the sweetness. They ship well (having no delicate edges to break off in the mail), and even a few days later still taste like a candy bar. If you really want to play up the similarity, you can omit the chopped nuts, and hide a single toasted almond beneath the ganache. These macaroons are my new favorite for shipping off across the country (or hiding away in my very own freezer).

Macaroons with Chocolate Ganache and Almonds (aka Almond Joy Cookies)
adapted from a recipe that Bon Appetit adapted from Marigold Kitchen, with thanks to Orangette for flagging
makes ~ 4 dozen
Cookies:
3 cups (lightly-packed) sweetened shredded coconut
3/4 cup sugar
3/4 cup egg whites (about 6)
pinch salt
1 1/2 tsp vanilla
1/4 tsp almond extract
Ganache and Topping:
9 oz bittersweet or semisweet chocolate, chopped
6 Tbsp heavy whipping cream (if shipping, reduce to 3 Tbsp for a firmer set)
1 Tbsp corn syrup (optional, but gives a nice gloss to the finished ganache)
~1/4 cup chopped and toasted almonds
coarse salt for sprinkling (optional)
Mix together the coconut, sugar, egg whites and salt in a heavy-bottomed saucepan. Cook over medium heat, stirring constantly once it warms. The mixture will gradually dry out and become less loose and gooey, and more of a sticky paste (~12 minutes). Remove from heat, and stir in the vanilla and almond extracts. Spread out in a thick layer on a cookie sheet, and refrigerate until cold, ~1 hour (you can also place in a sealed container and allow to sit in the refrigerator overnight).
When the dough is chilled, preheat the oven to 300, and line a couple baking sheets with parchment.
Take the chilled dough, and shape into packed, mounded heaping tablespoons (a mini ice-cream scoop is ideal for this). Place the cookies on the prepared baking sheets (they wont spread, so you dont need to space them too far apart). Bake until the coconut on the outside begins to get golden, ~20-30 minutes. Remove, let set on the sheet for a few minutes to firm up, and then transfer to a rack to cool completely.
When the cookies are cool, prepare the ganache. Place the chocolate, cream and corn syrup in double boiler, and heat until the chocolate is almost entirely melted. Remove from heat, and whisk until smooth. Spoon the glaze over the macaroons, allowing it to form little chocolate hats and drip down thickly over the sides. Sprinkle with toasted almonds, and, if desired, just a few grains of coarse salt (you can lightly press down any sticking-up almonds to make sure they are fully anchored in the ganache). Refrigerate until the ganache fully sets (at least two hours), then transfer to an airtight container. Store in the refrigerator or freezer, or ship off to the loved one of your choosing.
Wednesday, May 14, 2014
Sloppy Sauce aka Tahini with Miso and Almond Butter

Several years ago, I left my dog alone at a friends house for an evening, and returned to find that he had eaten all of the dog food in the house. All of it. When he came to greet us at the front door, he was noticeably larger. We rushed our barrel-shaped pup to the veterinarian, who pronounced him fine (and showed us an amusing x-ray, wherein you could still see all of the individual pieces of kibble in his overly-full stomach). In addition to piece of mind (and a hefty bill), we were given my absolute Favorite Diagnosis Ever: dietary indiscretion. Seriously. Dietary Indiscretion. Its sort of like diagnosis: bad decision-making. I suffer from that all the time.
For the most part, my diet is fairly healthy, full of fresh produce and whole grains and all that good stuff. But sometimes its not. Sometimes Im dining out, and the deliciously retro ice cream sundae on the menu calls to me. Or Im catching up with friends over happy hour, and after a few drinks an order (or three) of fries suddenly seems like a phenomenally brilliant idea. Or I am eating something so addictively delicious, say these little cheese-filled puff pastry palmiers at my friend Sarahs house, and I just cannot stop. Dietary Indiscretion.
After such poor choices, weve come up with a recovery meal known around our household as Hippie Dinner. Its the best way to sop up booze, grease, and bad decisions, and set you on the path to dietary righteousness. There are three elements: whole grains (in the form of some brown rice or quinoa); protein (in the form of marinated tofu or a piece of lean fish); and a huge pile of steamed or sauteed vegetables. Actually, make that 4 elements: the whole plate is topped off with a tahini variation called sloppy sauce.
Sloppy sauce, inspired by a friend who needed to recover from a nearly all-pizza diet, is a great way to make a huge pile of steamed kale and sweet potatoes much more exciting. It starts off like a traditional Middle Eastern tahini sauce, mixing sesame paste with lemon juice and garlic. But its given a bit of savory heft (and arguable health benefit) from a scoop of miso, and delicious nuttiness from almond butter. I like to further play up the East meets Middle East dimension by stirring in a bit of grated ginger, or a handful of scallions or chopped cilantro if youve got. And sometimes I emphasize the peanut sauce resemblance by using lime juice instead of lemon. As suggested by its name, sloppy sauce is a pretty informal affair, and can be easily adapted to your taste. And it can be enjoyed any time, whether youre recovering from a dietary indiscretion or not.

Sloppy Sauce (aka Tahini with Miso and Almond Butter)
yields ~3/4 cup
1 Tbsp miso (any type)
2 Tbsp tahini
2 Tbsp almond butter
1 clove garlic, crushed
1/2" ginger, grated
juice of 1 lemon
water
handful minced scallions and/or cilantro (optional)
Mix together the miso, tahini, and almond butter until well combined. Stir in the garlic and ginger, then the lemon juice. Add water, a little at a time, until it reaches a thick-but-pourable consistency (~1/4+ cup). Stir in the scallions and/or cilantro, if using. Taste, and adjust seasonings as needed. Pour over whatever hippie concoction you desire. The sauce will thicken upon standing, so just stir in a little additional water or lemon juice to loosen leftovers.
Saturday, May 10, 2014
Kreplach aka Jewish Wontons

My friend Sarah and I share a Jewish heritage, which can be hard to find in the Portland area (where there are more bicycle commuters than Jews). I usually end up at her house for the holidays. These tend to be table-groaning feasts, short on ceremony but long on delicious food. Most recently, these dinners have tended to be from the Sephardic tradition; the foods of Jewish populations in the Iberian Peninsula, and, post-Inquisition, Italy and North Africa. Sarah observed, "I find I like the food of Spain better than the food of Poland." After a few amazing meals full of saffron and artichokes and lemon and almonds, Im inclined to agree with her.
But while Ive enjoyed our olivey tagines and pomegranate fish and orange couscous, every now and then I get a hankering for the heavier, simpler foods of Eastern Europe. Part of it is nostalgia, memories of meals with my Russian Jewish grandparents. But part of it results from the basic charms of peasant food, the allure of what we like to call A Thing Wrapped in Dough.
Kreplach are silky, meat-filled dumpling, similar to wontons. They seem to be the very definition of village cooking, creating a delicious holiday meal out of humble ingredients. You take chicken left over from soup-making, after its dried-out and spent. You grind it up with mashed potatoes and broth to add back in a bit of moisture, and caramelized onions to reintroduce some flavor. Then you gussy the whole thing up inside a jacket of silky-smooth dough, and float them in some chicken soup. Among Jewish families of Eastern European descent, theyre traditionally eaten as part of holiday meals, usually on Rosh Hashanah and Yom Kippur.
Since I stopped eating chicken, Ive had to say goodbye to traditional foods like this. But, amazingly, you can make vegetarian kreplach. No, really. Heres the beauty: any vegetarian knows that chicken substitutes are often a bit short on authentic flavor, and the textures all wrong. But kreplach are built around chicken thats already been boiled in soup, and has lost its moisture and flavor. The meat is ground up, hiding any textural shortcomings. And its mixed with caramelized onions and potatoes, adding the flavor and moisture that are usually lacking in faux-meats. Weve made the chicken and vegetarian versions side-by-side, and even my friends who would sooner gnaw their own finger than try a veggie burger have declared that both versions are delicious.
A bit of warning: like any dumpling, kreplach do take some time. Theyre best made when youve got an empty afternoon, or an army of kitchen monkeys to help you. But they also freeze beautifully, so you can get the most out of your efforts by making several batches at once. They are most definitely worth it.


Kreplach
adapted from the amazing caterer Pamela Reiss, via a tutorial she gave on egullet
makes about 4-5 dozen dumplings
Dough:
3 cups flour
2 tsp salt
1 tsp baking powder
1/3 cup canola oil
1-1 1/4 cups warm water
Add the dry ingredients to the bowl of a food processor or mixer, and blend until well-mixed. With the blender going, drizzle in the oil, and then the smaller amount of water. Mix until smooth. Check the consistency -- it should be soft and smooth, but not too tacky. Add the remaining water if its not smooth enough (or more flour if its too sticky). Place the dough in a covered container so it doesnt dry out, and allow it to relax at room temperature for least 1 hour.
Filling:
2 Tbsp oil (or rendered chicken fat)
1 small yellow onion, peeled and diced
1 small red potato, peeled and cut into chunks
1/2 lb boiled chicken (or chicken substitute, either gluten or a product made to resemble chicken breast)
1/2 tsp salt
1/4 tsp pepper
up to 1/2 cup stock
Heat the oil (or chicken fat) in a cast iron or saute pan over a medium heat. Add the onions, and cook until well-caramelized (aka just the good side of burnt). This will take about half an hour. Turn the flame down if theyre going too quickly -- a nice slow cooking will yield the best flavor.
While the onions are cooking, toss the potato chunks into a small pot and cover with water. Bring to a boil, and simmer until theyre tender.
When the onion and potato are ready, put them in a food processor or meat grinder with the chicken. Process until everything is broken down into a rough puree. If youre so inclined, you can also add some of the skin from the boiled chicken, which gets chopped up and contributes a luscious richness to the finished dumplings. Mash the ground chicken and and potatoes and onions together with your hands or a wooden spoon, seasoning to taste with the salt and pepper. Add stock if needed for moistness -- you want to make sure its not too moist, or else it will soften the dumpling dough. Add just enough stock to make it like a spreadable pate. If you use faux meat, you might not need any stock at all.
To Assemble and Cook the Kreplach:
Take the dough thats been relaxing, and roll it out on a floured countertop to a thickness of 1/4" to 1/8". With a 2-inch round cutter (or drinking glass), cut out as many circles as you can. Pull up the remaining dough scraps, and re-knead into a ball (its best to do this step now, so that the dough has a chance to relax before being re-rolled). With a tiny ice cream scoop, or two spoons, place a ball of filling (about a tablespoon) onto each dough circle. Fold the dough around the filling to make a half-circle, pressing the edges to seal. Take the two corners and press them together, creating a tortellini shape. Place shaped dumpling on a well-floured cookie sheet. Roll out remaining dough scraps, and repeat the process.
When the kreplach are all shaped, bring a pot of salted water to a boil. Throw in a dozen or so kreplach. They will sink to the bottom, but then float to the top fairly quickly. Once theyve all floated to the top, simmer for an additional minute. Remove with a slotted spoon, toss with a bit of neutral-flavored oil (like canola), and spread on a cookie sheet or plate. Repeat until all kreplach are cooked. At this point they can be either frozen for future use, or floated in a bowl of soup and served.
Subscribe to:
Posts (Atom)