Showing posts with label summer. Show all posts
Showing posts with label summer. Show all posts
Wednesday, August 20, 2014
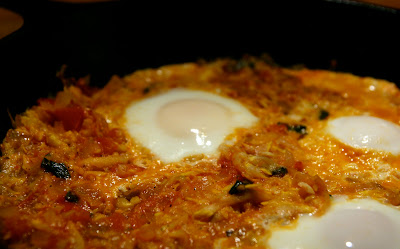
Eggs Poached in Summer Squash Saute
A few weeks ago, I was trying to help a friend come up with some quick and easy dinner plans. She was swamped at work, her husband was out of town, and her two young kids needed the usual amount of attention. I asked what shed been cooking lately. She listed a handful of dishes, nothing fancy but certainly nothing to sniff at. Also, she admitted with some level of embarrassment, theyd been having a lot of breakfast for dinner.
There always seems be some shame in having breakfast for dinner. Every time someone scrambles up an egg, or plops some pancake batter on the griddle, theres an accompanying feeling of not being a Proper Adult. PAs clearly know the difference between breakfast and dinner, and feed their family the appropriate meal for the hour (and also never, say, get past-due notices for their forgotten health insurance co-pays). But I argue that we should let go of those prejudices. Pancakes, eggs and the like make wonderful dinners. As long as you do them up right.
As Ive mentioned before, Im a big fan of poaching eggs in a sauce. They absorb flavor, the whole mess is deliciously fun to sweep up with a piece of bread (or tuck inside or tortilla), and, most importantly, its just really easy. This dish is no exception. Taking inspiration from a blog post I read a few months back, I cooked up a saucy saute of onions, fresh tomatoes, grated summer squash, and fresh basil. Then I made a few divots, cracked in some eggs, and covered and cooked til they were set to my liking. Add a slice of crusty flatbread, and its perfect. A delicious, one-pot, near insta-meal, with a healthy helping of vegetables. Wheres the shame in that? Breakfast for dinner, you do not disappoint.
And, if breakfast for dinner isnt your thing, I present an article I wrote on the flip side: dinner for breakfast. You can check it out in The Oregonian.

Eggs Poached in Summer Squash Saute
inspired by The Kitchn, but tweaked to my taste/groceries
serves 2
2 Tbsp olive oil
1 onion, chopped in a fine dice
2 cloves garlic, sliced
2 large tomatoes, diced
1 summer squash, grated on the coarse holes of a grater
1 handful fresh basil, chopped
salt and pepper
4 eggs
crusty bread or flatbread, for serving
Heat the olive oil in a large skillet over a medium heat. Add the onions and a sprinkling of salt, and cook until softened but not colored, ~7 minutes. Add the garlic, and cook for a few more minutes. Add the tomatoes, squash and basil, and cook, stirring occasionally, until the tomatoes break down and get saucy, and the squash is tender, ~10 minutes. The mixture should give off a lot of liquid, which is what you want (it will absorb/cook off when you cook the eggs). Add salt and pepper to taste. Make 4 divots in the mixture with the back of a spoon, and crack an egg into each divot. Cover, and let cook until the eggs are set to your liking. Top the eggs with a bit of additional salt and pepper, and serve with bread.
Tuesday, July 15, 2014
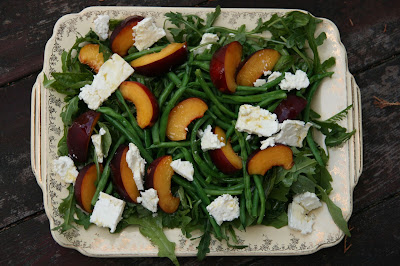
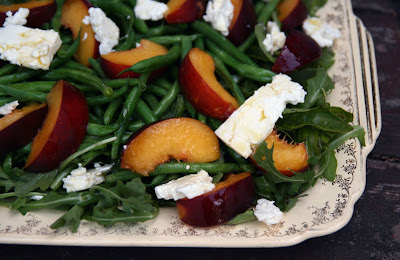
Summer Salad with Peaches Haricot Vert and Feta
There are some combinations of flavors that just seem meant to be. Almost unavoidable, even. Tomatoes, basil and mozzarella. Peanut butter, bread and jam. Peaches, green beans and feta. And yes, I realize the latter triumvirate may not quote have the renown of the first two. It was something of a surprise to me, too. But such a delicious one.
I had the good fortune to climb over the fence earlier in the week and crash a ridiculously early dinner my neighbors were throwing in honor of some visiting friends. Tasked with bringing bread and salad, I swung by the market with some vague ideas. I considered several different ingredients (Baby zucchini? Pickling cucumbers?), trying to remember recipes Id browsed and pinned. But finally, I just settled on grabbing handfuls of the things that look most delicious on these warm summer days. The drippy-sweet and oh-so-fragrant peaches that have just appeared, a few handfuls of baby arugula, and the teensy haricot vert green beans. I picked up some creamy French feta, and a handful of the starting-to-wilt-but-still-totally-usable basil in the back of my own refrigerator. And something great happened.
The green-green-green crunch of tender haricot vert somehow works perfectly with the sweet and juicy peaches (although I bet regular green beans would work in a pinch). Arugula and basil give a spunky herbal edge against the sweetness, and creamy, briny feta ties it all together. I added a simple vinaigrette, with an extra dollop of honey and not too much sour. Since this happy discovery, the salad has already made an encore performance (youre welcome, book club!), and I aim to recreate it at least once more before the season ends. Because really, you cant argue with a meant-to-be combination like this one.
Summer Salad with Peaches, Haricot Vert and Feta
serves ~10 (this was for a potluck — can easily be halved)
~ 2 cups haricot vert (aka small & skinny green beans), any hard stem ends snapped off
1 produce bag of baby arugula
a few handfuls basil leaves (torn if large)
3-4 ripe peaches, sliced into slim wedges
~1/3 pound creamy feta, such as French or Israeli, cut into thin slabs (theyll crumble, but thats fine)
Dressing:
juice of 1 lime
1/2 cup olive oil
1 tablespoon honey
2-3 teaspoons mild vinegar, such as sherry
salt to taste
Bring a pot of salted water to a boil. and have a strainer in the sink, and large bowl of ice water at the ready. When boiling, add the green beans, and cook until they turn a brighter green and just begin to become tender (this will only take a minute or two). When theyre done, dump them out into a strainer, then plunge into the ice water to stop the cooking. Let them sit there a few minutes until cool, and then drain.
To assemble the salad, place the arugula onto a super-large bowl or platter (or two reasonably large ones). Top with the basil, beans, peaches and feta.
Place the dressing ingredients in a jar with a tight-fitting lid (like a canning jar), and shake until emulsified. Taste and adjust seasonings as needed. Pour over the salad, and serve.
Saturday, June 21, 2014
How To Make Rhubarb Syrup For Your Summer Drinks and Cocktails
Rhubarb is a classic Scandinavian fruit served during the summer season. What I love about Rhubarb Syrup is that you can make it for your cocktails, ice tea and even make rhubarb ice cubes. It a fabulous syrup to make the night before you have a pool party. That way when your guest arrive for your pool party or Sunday brunch, all you have to do is combine the ingredients. No worries making it the day of a party!
This recipe is just to make ice cubes and should make about 2 cups of rhubarb syrup. If you need more liquid, you can add more water. If you like the syrup to be less sweet, use less sugar.
Other fun ideas
Read more »
This recipe is just to make ice cubes and should make about 2 cups of rhubarb syrup. If you need more liquid, you can add more water. If you like the syrup to be less sweet, use less sugar.
Ingredients
For the Rhubarb Syrup- 1 to 1 1/2 cup of chopped ruby red rhubarb (about 5 stalks rhubarb, cut into 1/2 inch thick)
- 1 cups water
- 1 cup of sugar or to taste
- 1 teaspoon of vanilla
- cinnamon stick (optional)
- large sauce pot with lid
- mesh strainer (- a colander with big holes won’t work!)
- Spoon
- cutting board
- knife
- measuring cup
First Step: Make the Syrup
- Clean the ruby red rhubarb under cold running water, cut into 1/2 inch pieces. Keep slicing until you get 1 cups of sliced rhubarb.
- To make the rhubarb syrup, combine chopped rhubarb, water, and sugar in a heavy-bottomed pot.
- Cook over medium-low heat, stirring often, until rhubarb has broken into shreds. It takes about 15 to 20 minutes. Keep an eye on the syrup. If it gets too hot, turn the temp down a little more.
- Let rhubarb cool for a few minutes before straining.
- Then, strain the syrup using a mesh colander. A colander with big holes wont work because alot of the rhubarb pieces might fall into the syrup. A cheesecloth is another helpful way to strain the syrup too. Otherwise, you might have to strain it a couple of times. I don’t mind the yummy rhubarb that might go through into the syrup but to get a clear syrup that is what you might want to do.
- Move the solids with a spoon around to extract more syrup. Just dont press the rhubarb mush because it might get into the syrup.
- Allow to cool so more. Set the syrup aside in the refrigerator
Other fun ideas
- Drizzle rhubarb syrup over plain or vanilla yogurt or vanilla ice cream.
- Rhubarb Syrup is great for ice tea.
- Top Icelandic yogurt with the rhubarb mush.
- The rhubarb mush or solids make a nice quick jam. Its great on toast!
- how to make Danish Christmas rice pudding with cherry sauce dessert recipe (Risalamande med kirsebærsauce)
- how to make Swedish Glogg for Christmas & cold evenings! (glögg or mulled wine recipe)
- how to make aeblskiver (æbleskiver)
- how to make Danish Christmas Klejner
- how to make easy Danish cucumber salad (arguksalat)
- how to make Danish sugar browned potatoes (brunede kartofler)
- how to make Danish red cabbage (rødkaal)
Sunday, May 11, 2014
Summer Sesame Noodles

For someone with such an overdeveloped sense of nostalgia, I have a ridiculously piss-poor memory. When somethings not in my direct line of vision, I can forget its existence entirely. Often this gets me into trouble, as I tell the same story repeatedly to my long-suffering friends. But sometimes it can be great. Recently my neighbor reduced me to hysterical laughter by telling me my very own joke that Id made and forgotten just a few weeks prior. (Something about not trading their duplex apartment for a house after marrying, because the change in status hadnt come with a signing bonus. Although, now that I think about it, it kinda does.) And then there are these sesame noodles: a while back this was my go-to summer picnic dish, to the point where I got a little sick of it. But I managed to forget about it entirely over the years, so when it somehow percolated to the top of my brain last week, it was a deliciously welcome surprise. Hello, old friend! Its so nice to see you again!
This recipe is adaptable, and can be easily tweaked. For dinner, you can enjoy it warm, perhaps with a bunch of broccoli tossed in. But for hot summer nights, especially when youre picnicking at the local zoo listening to a great band play, you can go a little lighter. The noodles have a nutty/salty/spicy balance, with a slick of sesame oil that keeps them nice and slurpy even when chilled. In the summer, I play up the cold slurpiness even further with crunchy half-moons of cucumber, and the juicy sour-sweet burst of sungold cherry tomatoes. You can include the tofu for a shot of protein, or omit it for an even lighter salad. Usually I spark the dish up with handfuls of cilantro, but instead I used the basil left over from a corn and tomato pie (more on that next week), and I think it was even nicer. Maybe even unforgettable.
And in other news of summertime funtime (outside of the culinary realm), I direct you towards a radio story I just produced on the 20th Anniversary North American Jews Harp Festival. Needless to say, that one will also be burned into my memory for some time to come.

Summer Sesame Noodles
serves ~4
inspired by a recipe for Skillet Szechuan Noodles included several years ago in The Splendid Tables Weeknight Kitchen mailing list, but since tweaked beyond recognition
12 ounces noodles (spaghetti or linguini are fine)
1 lb firm tofu, cut into 1/2" cubes
2 Tbsp canola or other high-heat oil
3 Tbsp sesame oil
2 Tbsp minced garlic
2 tbsp minced ginger
3 Tbsp peanut butter
3 Tbsp soy sauce, plus more for frying tofu
2 tsp fish sauce (optional)
1 Tbsp chili paste or chili oil
1 Tbsp sugar
1 Tbsp rice wine vinegar or lime juice
1/4 cup water
1 large cucumber, peeled, seeded, and sliced into half moons
4 scallions, thinly-sliced
1 large handful basil leaves, chopped
~3/4 cup sungold or other cherry tomatoes, sliced in half
Cook the noodles according to the package directions, then drain and run under cold water to stop the cooking. Place in a large bowl and set aside.
Heat the canola oil in a skillet over a high heat. When the oil is hot but not smoking, add the cubed tofu (careful of the spitting!), and sprinkle a bit of soy sauce over the cubes. Fry, turning after a few minutes and sprinkling on a bit more soy sauce, until the tofu is browned and crispy on the edges, ~5-7 minutes. Transfer the tofu to the bowl with the noodles, lower the heat to medium, and return the skillet to the stove.
Add the sesame oil to the skillet, and when its hot but not smoking add the ginger and garlic. Saute, stirring, until they soften and begin to brown. Add the peanut butter, soy sauce, fish sauce (if using), chili paste, sugar, vinegar or lime juice, and water. Stir or whisk until the peanut butter melts into the sauce, and it is somewhat thickened and shiny. Pour over the noodles, and toss well to combine. Taste and adjust seasonings to taste.
Allow the noodle mixture to cool slightly (just enough so that it wont cook the remaining ingredients), and add the cucumber, scallions, basil and cherry tomatoes. Toss gently to combine, and enjoy warm, cold or room temperature.
Thursday, May 8, 2014
How To Make Homemade Creamed Kale Sauce Grønlangkål For Danish Summer Dishes
Creamed kale sauce has been eaten with pork or tongue and potatoes in Denmark and Nordic countries for several centuries. A hearty meal great for the summertime when you have fresh grown kale. Below is a recipe to make homemade creamed kale sauce (grønlangkål).
Ingredients:
Prepare the Kale
Rinse kale well in large bowl of warm water. Place the kale in a colander and drain. Rip the leaves off the stem. Discard any discolored leaves and tough stems.
Then cook the kale in a pot of water. Add a little bit of salt into the water. Cook for about 20 minutes in order for the leaves to get soft. Then scoop the kale out of the pot, Slice the leaves crosswise into ½ inch thick slices with a sharp knife on a cutting board. Set it aside in a bowl.
Make the Cream Sauce
Melt the butter in the saucepan over medium heat.
Add the flour and whisk until the flour is absorbed into the butter (this a "roux"). Stir for about 2-3 minutes until it becomes thick, smooth and pale beige in color.
Add the milk gradually about 1/3 at a time, and whisk constantly. Keep stirring and bring to boil. Add Kale juices too. You dont want this to burn. Stir constantly for about 5-6 minutes until smooth and thick.
If the sauce is too thick, you need to prime with milk or kale juice. If it is too thin, boil a little more. Avoid the sauce tasting like flour by stirring well and carefully.
Turn down the heat. Add chopped kale. Add nutmeg for flavoring. Season with salt and pepper. Simmer the sauce for 1-2 minute without boiling.
Cover to keep warm until you are ready to serve. Serve "grønlangkål" with either cooked smoke ham or tongue and over potatoes. Enjoy!
Read more »
Ingredients:
- 1/2 tablespoon of butter
- 1/2 tablespoon of flour
- 1 cup of milk (other options is fish stock, chicken stock or beef stock)
- 1 large bunch of washed kale, finely chopped
- Salt and pepper
- nutmeg
- cutting board
- sharp knife
- small-medium heavy saucepan
- wooden spoon
Prepare the Kale
Rinse kale well in large bowl of warm water. Place the kale in a colander and drain. Rip the leaves off the stem. Discard any discolored leaves and tough stems.
Then cook the kale in a pot of water. Add a little bit of salt into the water. Cook for about 20 minutes in order for the leaves to get soft. Then scoop the kale out of the pot, Slice the leaves crosswise into ½ inch thick slices with a sharp knife on a cutting board. Set it aside in a bowl.
Make the Cream Sauce
Melt the butter in the saucepan over medium heat.
Add the flour and whisk until the flour is absorbed into the butter (this a "roux"). Stir for about 2-3 minutes until it becomes thick, smooth and pale beige in color.
Add the milk gradually about 1/3 at a time, and whisk constantly. Keep stirring and bring to boil. Add Kale juices too. You dont want this to burn. Stir constantly for about 5-6 minutes until smooth and thick.
If the sauce is too thick, you need to prime with milk or kale juice. If it is too thin, boil a little more. Avoid the sauce tasting like flour by stirring well and carefully.
Turn down the heat. Add chopped kale. Add nutmeg for flavoring. Season with salt and pepper. Simmer the sauce for 1-2 minute without boiling.
Cover to keep warm until you are ready to serve. Serve "grønlangkål" with either cooked smoke ham or tongue and over potatoes. Enjoy!
Subscribe to:
Posts (Atom)