4 medium plums, halved, pitted, thinly sliced
Showing posts with label and. Show all posts
Showing posts with label and. Show all posts
Friday, October 31, 2014
How to Make Danish Pancakes with Ice Cream and Fruit Sauce A Traditional Dansk Pandekage Recipe
When I was growing up my mother used to make Kale Soup then have Danish pancakes for dessert. As children we used to cling to our mother while constantly asking when the pandekager were done. Years later, if there is one thing our family still loves to eat is danske pandekager or Danish Pancakes.
Danish pancakes are very similar to crepes. However, traditional Danish pancakes are served as a dessert. Also, it appears that the Danish pancakes are bigger in size than the crepes and possibly a little sweeter too.

Danish pancakes are very similar to crepes. However, traditional Danish pancakes are served as a dessert. Also, it appears that the Danish pancakes are bigger in size than the crepes and possibly a little sweeter too.
Ingredients:
- 1 cup of all-purpose flour
- 2 teaspoons of sugar
- a pinch of salt
- 2 eggs
- 2 cups of milk
- European butter for frying
- grated lemon peel
- optional filling for the pancakes such as sugar, fruit or nutella
See our YouTube video to see how we made the Danish pancakes too!
Cooking Utensils:
- a whisk or a fork
- small bowl
- spatula
- grater
- a large non-stick frying pan
- measuring cups
- measuring spoons
Directions:
- Add all ingredients (except butter) into the bowl. Mix well until all clumps are gone.
- Let the batter sit in a large measuring cup for 20 to 30 minutes.
- Now you are ready to start frying pancakes! Add a bit of butter to a non-stick skillet and heat until medium warm.
- Tilt the pan approx 90 degrees and pour batter from the top. The batter will, run down and fill the pan from rim to rim. You can also pour the batter in the middle of the pan and quickly make circling motions to distribute the batter all over the pan. The goal is to have as thin a batter layer as possible.
- Cook until the pancake is a bit stiff. Before you flip the pancake be sure the pancake is firm on the edges.
- When ready flip over the pancake. You will see it is nice and golden brown. Cook the other side for another 1 minute. The pancake should be light brown on both sides.
- When ready, remove the Danish pancake from the frying pan.
- Repeat the steps until you have used up all of the batter.
 |
| The smell of danske pandekager on the pan is sure to attract everyone in the neighborhood. |
In Denmark, pandekager are normally served at kaffetid (coffee hour) at 3 p.m. Formally we usually have coffee or tea with the pancakes. If we have guests, we serve the pancakes on our Royal Copenhagen China and our Georg Jensen silverware.
Danske pandekager can be eaten in many ways. The traditional way is to eat Danish pancakes is to drizzle sugar or marmelade in the center of the pancake. Then roll up the pancake into a roll. My favorite way, albeit the messiest way is with vanilla ice cream and home made fruit sauce. Please see our blog and YouTube video (below) on how to make home made fruit sauce too!
Danske pandekager can be eaten in many ways. The traditional way is to eat Danish pancakes is to drizzle sugar or marmelade in the center of the pancake. Then roll up the pancake into a roll. My favorite way, albeit the messiest way is with vanilla ice cream and home made fruit sauce. Please see our blog and YouTube video (below) on how to make home made fruit sauce too!
A more modern way to eat Danish pancakes is with bananas and Nutella (Chocolate hazelnut spread). We never had Nutella with our pancakes growing up in Denmark. It is probably the last 10 or 15 years that eating Danish pancakes with Nutella is a popular choice too.
Filling ideas:
- fresh fruit - cut up strawberrys, bananas, blueberries, raspberries, etc
- jam or jelly
- sugar
- whipped cream
- Nutellla
Monday, October 13, 2014
Grilled Kale Salad with Ricotta and Plums

A few years ago, I spent Thanksgiving with some friends in a little rented cabin, where we opened (for reasons too ridiculous to go into) a $100 bottle of wine. Nobody at the table had ever drunk that much money before, so we made some jokes, took some deep breaths, and sipped. After a pause, everyone looked around the table, sighed deeply, and let loose with a "holy shit." Well, everyone except me.
While my friends were gasping over how amazing it was, and lamenting that it would make it that much harder for them to enjoy the cheap stuff, I was just sitting there saying yeah its good, or well sure it tastes different from other wines, but doesnt every bottle of wine taste different from every other bottle of wine? and other such statements that caused people with discerning palates to roll their eyes.
As much as it should be a point of shame in my culinary identity, Im totally fine being a cheap date when it comes to certain things. While I dont doubt that some can appreciate the difference, I figure there are some foods where the line between gourmet and grocery store wasnt all that significant. I mean, once you leave the chemical stuff behind and go for real salt, can you really appreciate the trace minerals in salt harvested in one sea versus another? Or does ricotta, the blandest of cheeses, really taste all that much better when it comes fresh-packed in a $10 artisanal bucket instead of an industrial $4 plastic tub? Well for the last one, it turns out it the answer is yes. A lot. Who knew?
Fancy ricotta is not an everyday purchase for me. But for a salad with just a few simple ingredients, I figured Id seek out the quality stuff. Our local natural store had stopped carrying it, but in a spectacular feat of customer service, they not only allowed me to taste spoonfuls of the two brands of ricotta on the shelf, but then (when the staff person told me that those flavors didnt compare), called their supplier to make an extra stop on their afternoon run and drop off a special case of the best stuff (in related news, I now have lovedreams about New Seasons market). I picked up a tub after the special delivery that night, and made this salad. And its amazing (and, as an added bonus, the leftover fancy ricotta made for a stellar baked ziti).
I am in awe of the person who thought up this inspired combination. Creamy, cold cheese, smoky kale, and punchy plums, tied together with a thyme-scented vinaigrette. Even setting the kale on fire a few times (I have grilling issues) did nothing to diminish the impact. Altogether, its like nothing else Ive ever tasted. I imagine regular ricotta would be alright in this salad, but the milky-fresh, sweet-tasting version makes it just amazing, and its sure to go on my list of summertime scene-stealers.

Grilled Kale Salad with Ricotta and Plums
adapted from Bon Appetit
serves 4-6
1/4 cup extra-virgin olive oil, divided
3 tablespoons balsamic vinegar
2 teaspoons chopped fresh thyme
1 teaspoon honey
Kosher salt, freshly ground pepper
1 large bunch kale leaves (curly is especially pretty, but lacinato is also nice)
3/4 cup fresh ricotta
Whisk 3 tablespoons of the oil, vinegar, thyme, and honey in a medium bowl. Season vinaigrette to taste with salt and pepper, and set aside.
Build a medium-hot fire in a charcoal grill, or heat a gas grill to high. Coat kale leaves with the remaining tablespoon of oil (you can brush it on, or drizzle and then shake-shake-shake the leaves between two large bowls) and grill, turning once, until crispy and charred at edges, about 2 minutes (mine lit on fire several times — not sure if this is due to a crappy grill or user error, or whether its just an inevitable hazard). Transfer to a work surface, and let stand until cool enough to handle.
Remove the large center stems with a knife and discard (just trim the tough ends from smaller, more tender kale stems), and chop/rip into smaller pieces if desired (larger pieces make for a more dramatic presentation, though theyre a bit harder to navigate).
Divide ricotta among plates, and top with a scattering of kale leaves and a tumble of plums. Drizzle with the vinaigrette, and serve.
Tuesday, October 7, 2014
Moroccan Carrot and Chard Salad

Its hard to know what to cook these days. Were not yet into the brown-leafed, squash-studded days of fall here in Portland, but at the same time its not really summer either. Weve been alternating between barbecue-ready sunny afternoons, and rainy cold days that make you wonder if its not too soon to dig out your wool sweaters. Hot soup? Cold salad? Hard to say.
This carrot and chard dish is one of my favorite recipes for these liminal days. Its a warm salad from the Moroccan tradition, pairing cooked carrots and chard with a bright herbal dressing. The recipe comes from Wolfgang Pucks contribution to The New York Times Passover Cookbook, and its graced our Passover table for the past two years. The seder meal is often a celebration of Spring, and sprightly spears of asparagus are a common choice. But its also right on the seasonal cusp, and depending upon the particulars of the Jewish calendar and the weather patterns, Passover can happen weeks before the chilly fields are even thinking about asparagus. This dish is a perfect choice for times like these, and not just because the shoulder crops of roots and greens are in season: the earthy/sweet carrots and rich chard provide a hearty, autumnal base, but the bright lemon juice and parsley perk things up with bright and sunny notes. On these strange days, when you wrap a thick cardigan around your sleeveless shirt, its the perfect recipe.

Moroccan Carrot and Chard Salad
adapted, heavily, from Wolfgang Pucks recipe in The New York Times Passover Cookbook (I roasted instead of simmered the carrots, upped the parsley, reduced the oil, and made a few other tweaks)
serves 4-6 as a side dish
2 lb carrots, peeled and cut on the diagonal into 1" chunks (or longer if you like a more dramatic presentation)
1/4 cup olive oil, divided
1 tsp ground cumin
1 large bunch (or two small bunches) Swiss chard, coarsely chopped (stems included)
1 clove garlic, pressed
zest and juice of 1 lemon
salt and pepper
1/2 large bunch (or 1 small bunch) flat-leaf parsley, chopped
Preheat the oven to 400 degrees.
Toss the carrots in a baking dish with 1 Tbsp of the olive oil, and sprinkle on the cumin and a few pinches of salt. Stir to coat the carrots with the oil and seasonings. Roast, stirring occasionally, until the carrots are soft and caramelizing on the edges, about 25-30 minutes (adjust the time depending upon how well-caramelized you like your carrots). Remove from the oven and set aside.
While the carrots are roasting, steam the chard in a steamer basket until wilted and soft, about 5-10 minutes. If you dont have a steamer basket, you can just simmer the chard for a few minutes in a large pot of boiling water, then drain well. Set aside.
In the meanwhile, make the dressing: mix together the remaining olive oil, garlic, and lemon juice and zest, and season with salt and pepper to taste. Place the carrots on a serving dish, top with the chard and parsley, and then pour the dressing over everything. You can toss to combine, or leave as is, like a composed salad. Serve warm. Its even nicer as the flavors sit and combine, but I seldom wait that long.
Saturday, September 27, 2014
Roasted Plum and Walnut Sundaes

Early in July, my dear friend broke her leg. Im not talking about a small, clean break, with a few days of pain and a few weeks in a cast. Im talking about surgery, pins and plates, about weeks of painkillers and not being able to put your foot on the ground for almost three months. Thats nearly a whole season of being bedridden. In the beginning, we ate a lot of ice cream.
As far as bedridden summertime consolation prizes go, ice cream is a pretty great one. Over the Summer Of The Tibial Plateau Fracture, I ate ice cream several nights a week. Taste-testing the difference between chocolate gelato (Talenti was the front-runner). Deciding if hot fudge sauce was better over lavender or vanilla ice cream (opinions here were split). Whether cardamom was delicious or "too perfumey" (again, a split decision). It was a delicious way to spend an indoor summer. And I didnt want to give it up just because the season changed.
And so the ice cream continues! But it needed a bit of an autumnal makeover. I grabbed a bag of Italian prune plums, the only fruit that seems to be in season these post-berry/pre-apple days. Eaten out of hand, theyre not really my favorite — sweet but unexciting, lacking the punchy tartness of most other plums. But roasted with a bit of sugar and lemon, they slump into rich fuscia sweetness, more complex, more inviting. And theyre perfect with vanilla ice cream. Add a sprinkling of walnuts, and its a perfect autumnal sundae. Even if youve moved out of summer and onto new pursuits (such as re-learning how to walk without crutches), its still a sweet way to cap off an evening.

Roasted Plum and Walnut Sundaes
serves 4
3/4 pound Italian prune plums
scant 1/4 cup sugar
juice of 1/2 lemon
4 scoops vanilla ice cream
1 large handful toasted walnuts
Preheat your oven to 400° Farenheit.
Cut the plums in half, remove the stones, and slice them into quarters. Sprinkle with the sugar and lemon juice, and roast until the plums are soft and somewhat collapsed, and the juices have come out and thickened just slightly, ~20 minutes (the juices will thicken further upon standing, so dont worry too much about that). Remove from the oven, and let cool slightly (lest you melt the ice cream like I did).
Scoop out the ice cream, and top with some of the plums and their juices, and a handful of walnuts. Enjoy.
Monday, September 22, 2014
Israeli Couscous with Garlic Scapes Shrimp and Feta

The first green asparagus of spring get a whole lot of love. Which I wholly understand — its been a long winter, and theyre totally delicious. But just a month or two behind them, there’s another green shoot that deserves its own parade: the garlic scape.
Garlic scapes, also known as garlic curls, or, adorably, whistles, are the twisted green tops of garlic plants. They’re generally cut to about eight-inch lengths, ranging from slightly bent stalks to irregular curlicues. Scapes are harvested in late spring/early summer (the season is hard-to-predict and fairly brief, but is happening right now in Portland) as a neat little gardeners trick: trim off the tips before the seed pods swells and matures, and in exchange that energy goes towards making larger garlic bulbs underground. And, as an added bonus, you get to eat the scapes.
Like garlic itself, scapes pack a punch when raw (though they’re not quite as intense as the bulb). You can use this to your advantage, adding a fine mince to dishes that will benefit from a strong flavor. But with just a bit of heat, scapes’ harshness softens, leaving a mellower garlic note, paired with their spring-green taste.
Scapes are easily turned into a pungent pesto—its got some bite, but can be tamed by tossing with hot pasta or spreading on bread and placing it under the broiler. They can be brushed with oil and tossed directly on the grill, or bathed in vinegar for a pungent pickle. Like spring ramps, scapes work especially well when paired with mellow ingredients that let their flavor shine through: cook them up with eggs, pasta, or creamy dairy-rich dishes.
For this dish, I put the scapes up against a backdrop of saffron-scented couscous, along with briny-sweet shrimp, creamy feta, and bright fresh mint leaves. Its simple enough to throw together for a weeknight dinner or picnic, but elegant enough for a fancy meal. I trimmed the scapes into bite-sized lengths, to make it a bit more manageable, but if youre game its far more fun to leave them as they are — like little green scraps of ribbon from your own spring garden party.

Israeli Couscous with Garlic Scapes, Shrimp and Feta
yields ~4-5 servings
2 tablespoons olive oil, divided
2 cups Israeli couscous
1 ½ cups water
1 cup vegetable broth (or just use all water, and add a bit more salt)
½ teaspoon salt
1 hefty pinch saffron
juice of ½ lemon
6-8 garlic scapes, cut into pieces or left whole
1 pound shrimp, shelled
⅓ cup crumbled feta
a handful fresh mint leaves, roughly torn if they’re large
salt and pepper
Heat 1 tablespoon of the olive oil in a large saucepan over a medium-high heat. Add the couscous, and cook for a few minutes, stirring so that the couscous is coated with oil and lightly toasted. Add the water, broth, saffron and salt. Bring to a boil, then reduce the heat until it’s just high enough to maintain a simmer. Simmer, covered, until the liquid is absorbed and the couscous is tender, ~8-10 minutes. Turn off the heat and let sit, covered, to absorb any remaining liquid for a few minutes. Then add the lemon juice, stir to fluff/combine, and add salt and pepper to taste (you can also drizzle in more olive oil if you want). Transfer to a serving platter.
Heat the remaining tablespoon of olive oil in a skillet over a medium-high heat. Add the garlic scapes, and saute for a minute or two, until they turn bright green and tender. Sprinkle with a bit of salt, and scatter on top of the couscous.
Add the shrimp, and saute for a few minutes, stirring, until pink and cooked through. Season with salt, and scatter, along with any pan juices, on top of the couscous and scapes. Top with the feta and fresh mint, and serve.
Sunday, September 21, 2014
Cucumber and Lemon water with a hint of mint A refresing summertime drink with Scandinavian flavors!
Are you tired of drinking plain water or having trouble hitting your eight glasses of water everyday? Try this fun recipe to make refreshing, zero-calorie cucumber lemon water with a hint of mint! What is terrific with this drink is that you can personalize to taste. The more slices of either cucumber or lemon you have in the pitcher the stronger it will taste. Also, the longer you leave both in the pitcher the taste will be stronger too. To start you might just want to have 2-3 slices of both the cucumber and lemon. Then, keep adding if you like the water to be a little stronger.
Ingredients
- 1 medium cucumber, scrubbed well
- Lemon/Lime, (optional)
- Warm water
- kitchen knife
- cutting board
- pitcher of water(tap or mineral water)
Instructions
Trim and discard ends of both the cucumber and the lemon. Cut both the cucumber and lemon into into thin slices. You will probably only need half a cucumber for the pitcher of water. It really depends on the size of pitcher you like.
Fill a pitcher up of either tap water or your favorite mineral water. Combine cucumber and water in large pitcher; steep for 1 hour, and serve over ice. Many times I like to go to the grocery store and pick up my favorite Norwegian water.
Now you are ready to serve with ice! For a stronger taste, let the water sit in your refrigerator for an hour prior to serving. Many times I like to add mint leaves either right into the pitcher of cucumber and lemon water or in the glass. Mint makes the drink even more cooling and refreshing.
Other alternatives is to add fresh berries or orange slices too! Enjoy!
Saturday, September 20, 2014
Black Sesame and Pear Tea Cake

Like many people, I tend to go for the classics when it comes to sweets. Especially this time of year. I like chocolate. I like vanilla. I like ice cream sundaes and creamy puddings and my neighbors chocolate chip walnut cookies. But, as I recently discovered, I also like black sesame and pear tea cake. Actually, I love it.
I know, it sounds strange. And looks a bit greyish and unappetizing. But its so good! Theres the nutty richness of the sesame seeds, the basic buttery sweet-but-not-too-sweet background, and the juicy bits of pear throughout it all. Although the recipe called for fresh fruit, I used some canned pears from last fall, and they worked beautifully (and the sesame seeds were left in the freezer from these why-havent-I-made-them-since-July bagel bombs, making this a surprisingly thrifty pantry project). Id be the first to admit that this doesnt seem like it would make anyones short list of favorite desserts. But paired with a cup of tea, or a glass of wine (in the interests of science, I sampled it both ways), itll definitely surprise you with just how perfect it is.

Black Sesame and Pear Tea Cake
adapted from Bon Appetit
Despite the fact that all of the pictures of this cake were somewhat sunken, even those baked up by master bloggers, I was convinced that with my room-temperature butter and eggs, masterful aerating technique, and light-as-a-feather folding, I would prevail with a perfectly domed cake. But I didnt. Ah well — perhaps thats just how this recipe rolls. Its still amazing, no matter how it bakes up.
1 1/2 cups flour
1 cup almond flour or almond meal
2 teaspoons baking powder
1/2 teaspoon baking soda
1/2 teaspoon coarse salt
2 tablespoons plus 1/2 cup black sesame seeds, divided
1/2 cup (1 stick) unsalted butter, softened to room temperature1 1/3 cups sugar, plus additional for topping the cake
1 large egg
1 large egg yolk
3/4 cup buttermilk
1 large ripe-yet-firm pear (fresh or canned), peeled, cored, cut into 1/4-inch cubes, and tossed with a few spoonfuls flour right before using
Preheat oven to 325° Fahrenheit, and butter and flour a loaf pan.
Sift together the flour, almond meal, baking powder, baking soda, and salt, and stir in 2 tablespoons of sesame seeds. Set aside.
Take the remaining 1/2 cup black sesame seeds, and grind them until they form a thick paste (this is easiest in a spice grinder, but with enough patience and scraping, you can use a blender). Set aside.
Cream the butter and sugar together until fluffy and well combined, scraping down the sides occasionally. Add the sesame paste, and beat another minute, then add the egg and yolk, and beat until pale and fluffy (3-4 minutes).
Fold in 1/3 of the flour mixture until just barely combined, then 1/2 the buttermilk. Repeat, ending with the flour, then fold in the pear. Pour into the loaf pan, smooth the top, and sprinkle with a few spoonfuls of sugar. Bake until a tester comes out clean, 50 minutes to 1 1/2 hours (yeah, I know thats a crazy big range, but the reports seem to back it up — mine definitely took the full hour and a half). Let cool in the pan, then turn out, slice, and enjoy.
Tuesday, September 16, 2014
Couscous Salad with Spinach Feta Cherry Tomatoes and Herbs

Sometimes Im all over the perfect dish for the season, anticipating things a few weeks out. These past few weeks Ive been chafing at the bit with a lovely concord grape recipe, calling a circuit of grocery stores every few days to ask Are they in yet? How about tomorrow? Maybe Monday? Im surprised the produce departments keep answering the phone. But other times, well -- not so much. And so, as the cold and windy rains roll into Portland, I present to you the perfect picnic dish. On the bright side, itll still be good for Autumnal potlucks.
As Ive mentioned before, Im a sucker for the combination of spinach and feta. But instead of a warm and uber-cheesy casserole, this is a light, herb-studded couscous salad (even healthier if you, like me, go with whole wheat couscous), with bright and juicy cherry tomatoes offsetting the small amount of briny feta. The spinach is just slightly wilted enough to be manageable and allow you to stuff copious amounts of it into the finished salad (using the residual heat of the couscous along with the old Mediterranean trick of rubbing it with salt), but its still bright green and fresh-tasting. Thanks to a sweep at the farmers market I used a combination of fresh basil, dill, parsley and mint, but it would be good with a few handfuls of whatever fresh herbs you have.
And speaking of things you think of just in the nick of time, heres an article about matzo ball soup, in honor of Rosh Hashanah, the Jewish New Year that begins tomorrow night. Perhaps getting a bit more on top of things will be one of my resolutions.

Couscous Salad with Spinach, Feta, Cherry Tomatoes and Herbs
makes a sizable picnic or potluck contribution, or serves ~6 as a light main dish
2 1/2 cups water or broth
2 cups whole wheat couscous
~1/4 cup olive oil, divided
1 bunch spinach, washed and chopped fairly small
3 scallions, thinly-sliced
1 large handful fresh dill, chopped
1 large handful fresh parsley, chopped
1 large handful fresh mint, chopped
1 small handful fresh mint, chopped
juice of 1 lemon
scant 1/4 cup crumbled feta
1/2 pint cherry tomatoes (Im currently obsessed with sungolds), halved, or quartered if theyre large
salt and pepper
Heat the water or broth (salt it if youre using water) to a boil in a pot. Add the couscous and a dollop of olive oil. Stir and bring it back to a boil, then turn off the flame and let sit, covered, for five minutes.
While the couscous is sitting, place the spinach in a large bowl. Sprinkle it with a bit of salt, then scrunch it in your hands to distribute the salt and cause the spinach to wilt slightly. Top with the scallions.
When the couscous is done, fluff it with a fork, and tip it on top of the spinach and the scallions, letting the heat of the couscous soften the greens. Let sit a few minutes while you chop the remaining fresh herbs.
After the couscous has sat for a few minutes, add the remaining herbs along with the remaining olive oil and the lemon juice. Toss, mixing the ingredients well (which will also cool off the couscous a bit). Add the feta, cherry tomatoes and a few grinds of pepper, and toss gently to combine. Taste and adjust seasonings and olive oil/lemon juice balance as needed. Serve warm or cold.
Monday, September 15, 2014
How to make Danish Red Cabbage Rødkaal Danish side dish for dinners and leftovers
How to make Danish Red Cabbage Rødkaal. Danish side dish for dinners and leftovers By Danish cook Karen Grete.
This side dish is a stable in all Danish homes.This is a perfect dish to make ahead. If you make enough Danish red cabbage, it is great as a left over food to reheat the next day.
Ingredients:
* 1 red cabbage
* 1 cup of apple vinegar
* 2 cups of water
* 1 teaspoon of salt
* 1/4 cup of sugar
* a little pepper for taste
* add a couple of teaspoons of red currant
Simmer for about 2 hours.
Please share and like our video. For more Scandinavian cooking videos please subscribe to our channel too! Thank you!
Instruction:
Cut an entire red cabbage in half. Remove and discard tough outer leaves and the white center from the red cabbage. Then, with a sharp knife slice the red cabbage into thin slices. Then, place all of the sliced red cabbage into a heated simmering pan. Then, add apple vinegar, 2 cups of water, 1 teaspoon of salt, 1/4 cup of sugar and a little bit of pepper. It has to cook for about 2 hours in order for it to get soft enough. In the meantime, you can do other things while you are waiting for it to cook. After 2 hours, add a red current or cranberry jelly for flavor. Some people enjoy caraway seeds for flavor.
What to eat with the Danish Red Cabbage Rødkaal? In Danish homes, red cabbage is served either at dinner or lunch. Traditionally, the Danish red cabbage accompanies meat dishes. Danish hot meals such as frikadeller (Danish meat balls) or flæskesteg (roast pork with crackling) has the Danish red cabbage as a side dish. Christmas (Jul) dinners always has the Danish red cabbage. If you make enough Danish red cabbage, it is great as a left over food to reheat the next day. Also, Danish cold lunches such as an open sandwiches, known as smørrebrød, are decorated with a variety of fine ingredients including the danish red cabbage as a topping.
We hope you enjoyed the Danish red cabbage video and recipe! If you like this danish red cabbbage recipe as a side dish, please be sure to subscribe to our YouTube Channel Scandinavian Today. Our channel has videos including
*how to make Danish Christmas rice pudding with cherry sauce dessert recipe (Risalamande med kirsebærsauce)
*how to make Swedish Glogg for Christmas & cold evenings! (glögg or mulled wine recipe)
*how to make aeblskiver (æbleskiver)
*how to make Danish Christmas Klejner
*how to make easy Danish cucumber salad (arguksalat)
*how to make Danish sugar browned potatoes (brunede kartofler)
*how to make Danish red cabbage (rødkaal)
These recipes are perfect for the holiday season. Please let us know what you think! Glædelig Jul and Merry Christmas♥ !
Our Scandinavian recipes including Danish, Norwegian, Swedish and Finnish are on http://.blogspot.com/
Follow us either on Twitter @, Blogger, Google+, Google Pages, Pinterest and Subscribe to our YouTube Chanel Scandinavian Today! Lets get cooking Scandinavian foods!
Read more »
This side dish is a stable in all Danish homes.This is a perfect dish to make ahead. If you make enough Danish red cabbage, it is great as a left over food to reheat the next day.
Ingredients:
* 1 red cabbage
* 1 cup of apple vinegar
* 2 cups of water
* 1 teaspoon of salt
* 1/4 cup of sugar
* a little pepper for taste
* add a couple of teaspoons of red currant
Simmer for about 2 hours.
Please share and like our video. For more Scandinavian cooking videos please subscribe to our channel too! Thank you!
Instruction:
Cut an entire red cabbage in half. Remove and discard tough outer leaves and the white center from the red cabbage. Then, with a sharp knife slice the red cabbage into thin slices. Then, place all of the sliced red cabbage into a heated simmering pan. Then, add apple vinegar, 2 cups of water, 1 teaspoon of salt, 1/4 cup of sugar and a little bit of pepper. It has to cook for about 2 hours in order for it to get soft enough. In the meantime, you can do other things while you are waiting for it to cook. After 2 hours, add a red current or cranberry jelly for flavor. Some people enjoy caraway seeds for flavor.
What to eat with the Danish Red Cabbage Rødkaal? In Danish homes, red cabbage is served either at dinner or lunch. Traditionally, the Danish red cabbage accompanies meat dishes. Danish hot meals such as frikadeller (Danish meat balls) or flæskesteg (roast pork with crackling) has the Danish red cabbage as a side dish. Christmas (Jul) dinners always has the Danish red cabbage. If you make enough Danish red cabbage, it is great as a left over food to reheat the next day. Also, Danish cold lunches such as an open sandwiches, known as smørrebrød, are decorated with a variety of fine ingredients including the danish red cabbage as a topping.
We hope you enjoyed the Danish red cabbage video and recipe! If you like this danish red cabbbage recipe as a side dish, please be sure to subscribe to our YouTube Channel Scandinavian Today. Our channel has videos including
*how to make Danish Christmas rice pudding with cherry sauce dessert recipe (Risalamande med kirsebærsauce)
*how to make Swedish Glogg for Christmas & cold evenings! (glögg or mulled wine recipe)
*how to make aeblskiver (æbleskiver)
*how to make Danish Christmas Klejner
*how to make easy Danish cucumber salad (arguksalat)
*how to make Danish sugar browned potatoes (brunede kartofler)
*how to make Danish red cabbage (rødkaal)
These recipes are perfect for the holiday season. Please let us know what you think! Glædelig Jul and Merry Christmas♥ !
Our Scandinavian recipes including Danish, Norwegian, Swedish and Finnish are on http://.blogspot.com/
Follow us either on Twitter @, Blogger, Google+, Google Pages, Pinterest and Subscribe to our YouTube Chanel Scandinavian Today! Lets get cooking Scandinavian foods!
Monday, September 1, 2014
Kale Peach Corn and Feta Salad

My friend Emily often talks about being willing to "re-meet" someone -- to set aside earlier impressions youve formed (rightly or wrongly), and give people another chance to show you who they can be. Its a lovely concept. All too often we are boxed in by previous assumptions or rumors, which can keep us from getting to know some truly extraordinary people. Or, in this case, salads.
In general, I dont think of myself as a terribly fussy eater. I mean, sure, I want my food to be good, and made of actual food and all that. But my prohibitions are fairly minimal: I hate hate hate bananas. Im not too keen on cooked bell peppers, after their over-use in the college food service vegetarian menu. And I dont like to mix my sweet and my savory.
Or, rather, I thought I didnt. As it turns out, sweet and savory can combine into some truly great dishes. Im not talking about raisin-studded green salads, or industrial catering wild-rice-with-dried-cranberry pilafs (which might have been how I came up with this aversion in the first place). Im talking about a salad of drippy-sweet peaches, oh-so-green kale, sunny fresh corn and creamy feta.
I saw this recipe about a month ago on one of my favorite blogs, and pulled it out a few nights ago when I needed a dish to bring with me as I went to watch the local chimney swift migration with a few friends (What? Isnt that what you do on a summer evening?). I figured that even if I didnt like the combination, our potluck picnic would take care of any leftovers. But oh man did I love this. This salad was the perfect bit of Oregon bounty to accompany the natural beauty. The peaches are sweet and juicy, as is the corn (in a different way), but the deeply vegetal kale and briny feta tie it all together. And also, well, its just so pretty (using the purple-veined Red Russian kale doesnt hurt in that department). This salad is not the sweet-versus-savory fight I always fear -- its the very best of summer, from the trees and from the fields, coming together in beautiful harmony. I cant wait to find out whats going to surprise me next.

Kale, Peach, Corn and Feta Salad
from Last Nights Dinner, as inspired by a salad at Diner
serves ~6 (great accompanying a light pasta dish, as we enjoyed it, or just a crusty loaf of bread)
1/4 cup olive oil
juice of 1 lime
2 Tbsp sherry vinegar
dollop honey
salt and pepper
1/2 small red onion, sliced into thin half-moons
1 bunch kale (I like Red Russian), washed and torn into small pieces
1/2 bunch cilantro, washed and coarsely chopped
2 ears of corn, cut off the cob
3 peaches, cut into slim wedges
1/4 cup feta (preferably a moist, mild feta, like French or Israeli), crumbled
In a large bowl, whisk together the olive oil, lime juice, sherry vinegar, honey, and season with salt and pepper to taste. Add the onion, and let sit for a few minutes to mellow. Add the kale and cilantro, and mix well to coat with the dressing (I like to sandwich two aluminum bowls together, and shake shake shake until its coated). Let the mixture sit for an hour for the kale to absorb the dressing and soften. Then scatter the corn, peaches and feta over the top and devour.
Thursday, August 28, 2014
Baked Orzo and Faux Meatballs

This dish has a few strikes against it, blog-wise. First off, I make my version with fake meatballs, which I realize are not a universal favorite (although you can easily substitute the real meaty deal instead). Secondly, its kinda ugly. Just a homely casserole, and not helped by my low-light pictures. I first discovered this dish a few months ago, and loved it. But I was a bit too embarassed to bring its homeliness into high resolution. But when I made it for the third time in two months, I figured its day had come. Admittedly, its a far cry from fancypants dinner party fare. But oh man is it delicious.
Living with a lactard, Ive learned to go without comforting baked pasta dishes -- its really hard to find one that isnt bound with lashings of cheese or cream sauce. But this orzo is different. A base of aromatic onions, celery, and pepper are sauteed up, made saucy with tomatoes, and baked with slippery bits of orzo pasta. The whole mess is topped with meatballs (faux or otherwise), and a sprinkling of sheeps milk feta (which is deemed easily digestible by our household dietary restrictions). Its one-pot easy, satisfying, and delicious. Really delicious. Well worth swallowing your pretty-food pride.

Baked Orzo and (Faux) Meatballs
adapted from Ivys Feast
serves 4-6
If you dont have a stovetop-to-oven pot like a Dutch oven, you can prepare this in a large sautee pan, and then transfer to a casserole dish to bake. As written, this recipe features a balanced mix of vegetables, rather than a strong tomatoey flavor. If youd like it saucier, substitute the additional tomato sauce for part of the water (details below). Both variations are nice.
2 Tbsp olive oil
1 large onion, finely diced
2 stalks celery, finely diced
1 small yellow or green bell pepper, finely diced
3 cloves garlic, finely chopped
1 15-oz can chopped tomatoes
1/2 cup tomato sauce (optional)
1 tsp dried oregano
1 tsp dried dill
1 1/2 cups orzo
4 - 4 1/3 cups water or broth
salt and pepper
4 oz feta, crumbled
1 1-lb package of faux meatballs, or an equivalent amount of standard meatballs
Preheat the oven to 350 degrees.
In a dutch oven, heat the olive oil over medium heat. Add the onions, celery, and bell pepper, and sautee until the vegetables are softened and the onion is translucent, about 10 minutes. Add the garlic, and sautee another minute. Add the tomatoes, tomato sauce (if using), and dried seasoning, and stir to combine. Add the orzo, and mix well. Turn off the heat.
If youre using a Dutch oven, add the broth or water (the smaller amount if using the tomato sauce, the larger amount if not). If you dont have a Dutch oven, transfer the vegetable-orzo mixture to a casserole dish now, and then add the broth. Season to taste with salt and pepper (keeping in mind that the feta will contribute a bit more salt). Cover, and transfer to the oven. Bake 30 minutes.
While the orzo is baking, prepare the meatballs according to directions (I usually just throw them in a baking pan alongside the casserole, to crisp up while the oven is on). If using meatballs, pan-fry until done.
After 30 minutes, remove the casserole from the oven. Scatter the meatballs over the top, pressing them down into the orzo. Sprinkle with feta, cover, and return to the oven for 10-15 minutes, until the liquid is mostly absorbed, and the feta is melting. Remove from the oven, and let stand for an additional 10 minutes (the remaining liquid should absorb). Enjoy.
Tuesday, August 26, 2014
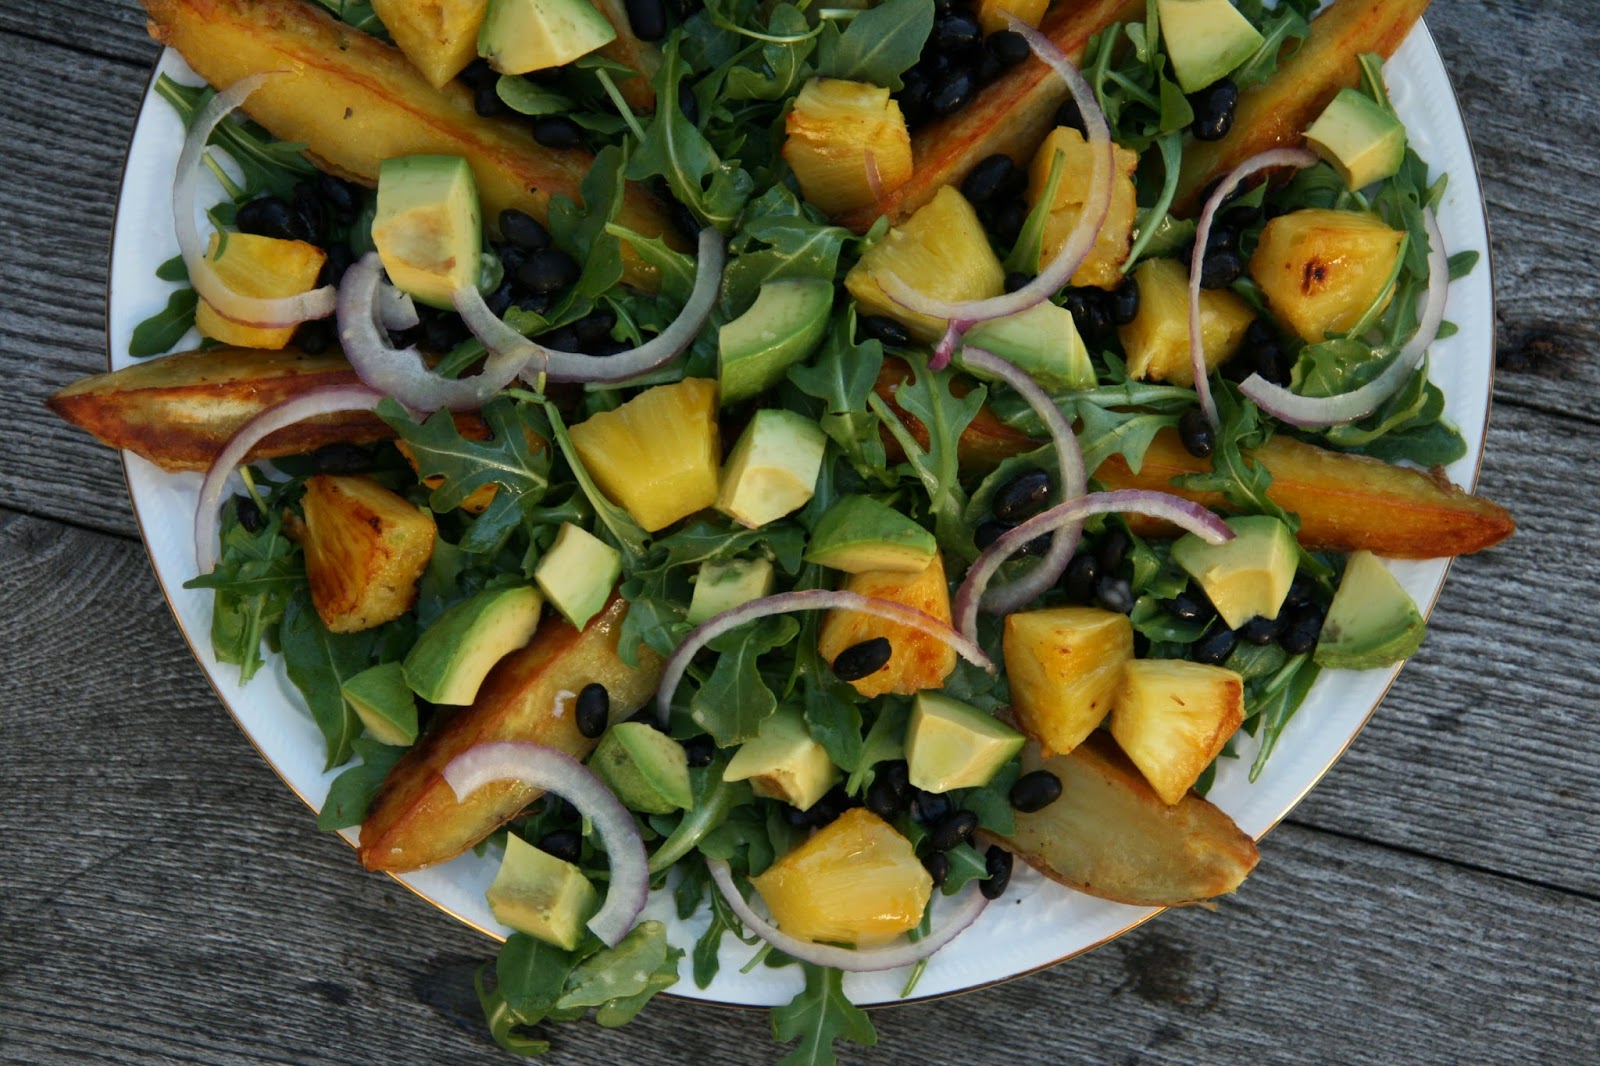
Pineapple Avocado and Sweet Potato Salad
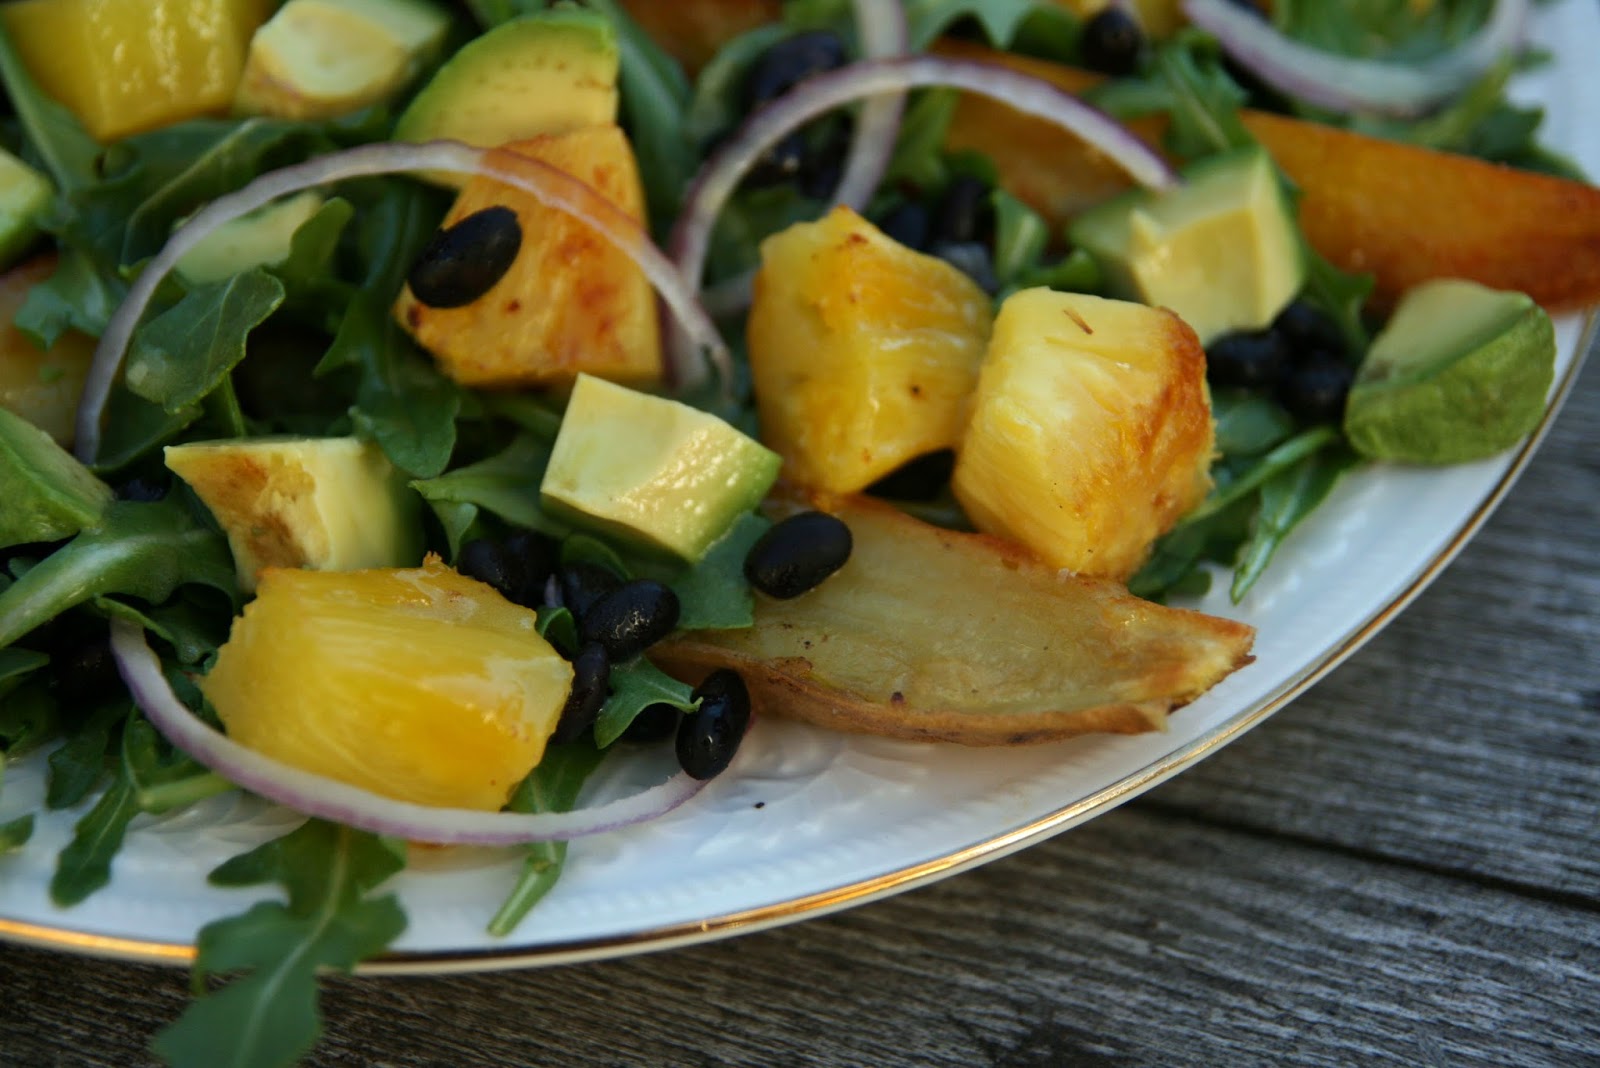
Preparing a vegan dish can feel like enough of a challenge for some cooks. But vegan and gluten-free? Oh, and also toddler-friendly? Facing these restrictions at a recent potluck dinner party, I contemplated some sort of plate full of tofu. It works, right? But instead, I decided upon this salad.
For the record, I happen to really like a plate full of tofu. But I also really, really like this salad. This is not a dish that screams out I meet a rigorous listing of dietary restrictions! Its a dish that says Hello! Would you like some tropical pineapple, broiled into caramelized sweetness? How about a buttery chunk of avocado?
The inspiration for this salad comes from a Cuban recipe, all sweet pineapple, smooth avocado, and snappy greens. I kept the basic format, but also added some wedges of sweet potato and a handful of beans, to make it more of a meal. And its a good one. Topped with sweet-yet-healthy bites that toddlers will happily grab onto, sans animal products and gluten, and full of delicious.
Pineapple, Avocado and Sweet Potato Salad
adapted from Gran Cocina Latina: The Food of Latin America
serves ~4-6
3 small white or orange sweet potatoes, scrubbed & woody end bits trimmed off as needed
1 good-sized pineapple, peeled, cored, and cut into 1-inch thick slices
1 tablespoon sugar
1/4 cup olive oil, plus additional for sweet potatoes
1 clove garlic, pressed
2 tablespoons lime juice
hefty pinch salt
1 bunch arugula, washed and torn into bite-sized pieces
1 large buttery avocado, cut into cubes
1/2 red onion, thinly sliced
1/2 cup cooked black beans (optional)
Set the sweet potatoes in a large pot of water, and bring to a boil. Let simmer until just fork-tender, ~15 minutes, and remove from the pot and let cool slightly.
While the sweet potatoes are cooking, preheat your broiler. Place the pineapple slices on a baking pan, and sprinkle with the sugar. Broil until caramelized to a golden brown, ~5-10 minutes (broilers can incinerate things quite easily, so check often!). Remove from the oven and set aside to cool.
Turn your oven from broil to 450° Fahrenheit. Cut the par-baked sweet potatoes into wedges, and place them on a baking pan. Drizzle lightly with oil, and sprinkle with salt. Roast until they are butter soft and starting to become golden on the edges, ~20 minutes, turning once. Remove, and let cool.
To make the dressing, place the olive oil, garlic, lime juice, and salt in a covered jar, and shake to emulsify. Taste, and adjust as needed.
To assemble the salad, place the arugula in a large bowl, and top with the avocado, red onions, black beans, and reserved pineapple and sweet potato wedges. Top with the dressing, toss (if desired), and serve.
Saturday, August 23, 2014
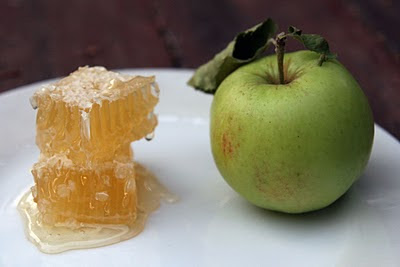
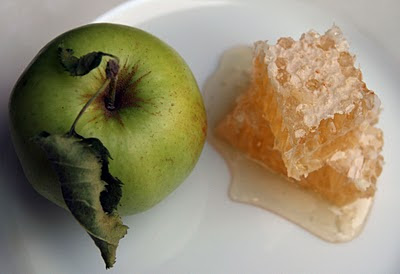
Apple and Honey Desserts
Twice this last week, after not seeing them in god-knows-how-many years, I happened upon katydids. Twice! One was slowly, methodically, walking across the window screen outside my office (or, as its also known, the kitchen). The other was, inexplicably, clinging to the ceiling outside the bathroom.
I know these bugs are fairly common, but I seem to have gone years without encountering one. I spent a few silent minutes transfixed by each discovery, staring at their weirdly leaf-like bodies, and the multi-jointed antennae that tap-tap-tap out a path like a blind mans cane. It all reminded me of how many hours I spent as a kid just wandering in my suburban backyard, making my own small fun and seemingly epic discoveries.
Next week brings the Jewish holiday of Rosh Hashanah, the start of the new year. Like any milestone (or katydid discovery), it makes you think about where you are in life, and how things used to be so many years ago. If you tend towards the melancholic, it can be kind of a downer. But its also a wonderful opportunity to think of the sweetness of it all.
In Jewish tradition, this sweetness is commonly celebrated with apples and honey. And so, on this occasion of a new year, I bring out a collection of elegant versions of this combination. You can find all of the recipes at NPRs Kitchen Window.
Friday, August 22, 2014
Corn Cherry Tomato and Basil Pizza

I tend to like my pizza — my home-made pizza at least — topped with strong flavors. Kale, blue cheese and walnuts. Garlic scapes and potato. Asparagus, goat cheese and anchovies. But a hot, late summer night calls for a different kind of pizza. A more delicate pizza. A summer pizza. A corn, tomato and basil pizza.
I know that corn on pizza doesnt sound very Italian. And I know that I used a hippie whole wheat dough, that my crust is entirely devoid of char, and my mozzarella started to brown. It was just that kind of night. But even so — this pizza was delicious.
The sweet corn only gets sweeter in a hot oven, and the punchy bursts of tomato (I went with some never-disappointing Sungolds a friend was kind enough to share form her garden) and fresh basil come together in a way that just feels perfect. Its sweet and juicy (from both the corn and the tomatoes), but its also savory and aromatic. And even though its pizza, its surprisingly light. Its summer.

Corn, Cherry Tomato and Basil Pizza
1 ball of pizza dough, ~10 oz
semolina or regular flour for dusting
1/4-1/3 lb mozarella, shredded
kernels shaved off 1 ear of corn
2 dozen small cherry tomatoes (preferably Sungold), sliced in half
olive oil
coarse salt
1 handful basil leaves, torn if large
Preheat your oven, with a pizza stone if you have, to 500 degrees for an hour. If your pizza dough has been refrigerated, let it come to room temperature for an hour.
Place the pizza dough on a lightly-floured counter top, and press outward into a thick disk (leaving a 1" unpressed area along the edge as the crust). Pick up the disk and let it drape over the backs of your hands, letting gravity help you stretch it into a 12-14" circle. If the dough resists, let it relax for a few minutes, then try again. Place the stretched dough on a peel (or overturned cookie sheet or cutting board) thats lightly dusted with semolina or other type of flour.
Scatter the mozzarella on top of the dough, then the corn and tomatoes. Drizzle the whole pizza with a small amount of olive oil, and a sprinkling of salt. Slide the pizza onto the preheated stone in your oven, and bake ~7-10 minutes, until the crust browns and the cheese melts.
Remove the pizza from the oven, and let cool for a moment (if youre making one pizza, you can leave it on the stone, otherwise I like to transfer to a rack, or just slide a knife or such between the peel/cutting board and the pie, to let the steam vent so it doesnt soften itself). Transfer to a cutting board if you havent already, and scatter on the basil. Slice and serve.
Saturday, August 16, 2014
Vietnamese Turmeric Fish with Rice Noodles Dill and Nuoc Cham

For many diners, all it takes to enjoy a meal is the right condiment. Some people (and, for convenience, well call them Midwesterners) douse any number of dishes with ketchup before consumption. Others carry around a small bottle of a favorite hot sauce in their purse. For me, the magic condiment is fish sauce and lime juice.
Okay, its not quite as versatile as ketchup. And I realize that fewer Americans share this obsession. But I love, love, love this combination. Funky, salty, umami-rich fish sauce, mixed with a bright sour hit of lime? Perfect. Add a little sugar to sweeten out the edge, and some water to lighten things up (yielding nuoc cham, a favored dipping sauce), and theres nothing better. And lest you vegetarians feel left out, you can often find fish-free fish sauce substitutes at Asian markets (look for the Vietnamese word chay, which means vegetarian, and also look out that it doesnt use msg as a shortcut). Even if youre wedded to ketchup, you should give this combination a try.
I usually put together my favorite nuoc cham to dress rice noodle salads (or, if I must admit, frozen potstickers). But a few years ago I tried this amazing catfish dish at a local Thai restaurant. Catfish was dredged in a turmeric-heavy rice flour coating, then pan-fried and served on a bed of rice noodles. Some fresh herbs (including the I-didnt-know-it-was-used-in-Southeast-Asian-cooking dill) were sprinkled on top. And my beloved fish sauce dressing pulled it together beautifully. A basic fried fish, when it came down to it, with an exciting punch of flavors. I had to make it at home.
Trolling around the internet, I discovered that this recipe is famous in Vietnam, originating in Hanois Chả Cá Lã Vọng restaurant. Recipes vary -- some with fried shallots, some with grilled instead of pan-fried fish -- but the basic model of turmeric-scented fish, rice noodles, fresh dill and nuoc cham remains the same. Ive made it several times, barely following a recipe, adapting to the fresh herbs on hand (as long as dill is in the mix), and often tossing in some totally non-traditional broccoli or spinach to green up the meal. Sometimes I fry whole fish fillets and break them into the rice noodles as I eat, other times I cut the fish into bite-sized pieces before dredging and frying. Its always great. Its also a lovely summer choice, as theres no oven involved, just a bit of pan-frying. So when I had some fresh dill left over recently after cooking up a pile of Swedish midsommar food, and when I realized I had never told you about this dish, it was the logical dinner choice. Perhaps itll win over some new nuoc cham devotees.

Vietnamese Turmeric Fish with Rice Noodles, Dill and Nuoc Cham
serves 4
adapted from several sources, notably Mai Phams The Flavors of Asia
Sauce:
1/3 cup lime juice
1/2 cup fish sauce
1-2 Tbsp sugar
1/2 cup water
1 clove garlic, minced
4 small fresh chilies (or more or less to taste), sliced into rings
Noodles, Fish and Herbs:
6 ounces rice vermicelli (1/2 package)
1/2 cup rice flour
1 tsp turmeric
1/2 tsp salt
2 large fillets (~1 lb) catfish, tilapia, or similar fish (Im currently smitten with the cheap-and-delicious Swai), left in fillets or cut into 2" pieces, as you prefer
2-3 Tbsp high-heat oil for cooking, such as canola
1 bunch scallions, thinly-sliced (~1/2 cup)
1 bunch dill, roughly chopped (~1 cup), divided
1 handful basil leaves, roughly chopped
1 handful cilantro, roughly chopped
1/4 cup roasted peanuts
hot sauce, such as sriracha
Prepare the dressing by mixing together all of the dressing ingredients in a bowl. Adjust as needed to get the hot-sour-salty-sweet balance to your taste. Set aside.
Cook the rice noodles according to the directions on the package, and set aside at room temperature.
Heat a large frypan over a medium-high heat. On a plate, mix together the rice flour, turmeric and salt until well-combined. Place the fish on the plate, and press into the rice flour coating so that it adheres. Turn the fish over over and coat the other side.
When the pan is hot, add ~2 Tbsp oil. Add the fish, and fry on each side until done, ~3-5 minutes per side, depending upon the size of your pieces. Remove from the pan and set aside. In the same skillet (adding another Tbsp of oil if its dry), add the scallions and half of the dill. Saute for a minute or two, until the herbs soften and just begin to cook. Turn off the heat, and add the remaining dill and the other fresh herbs.
To serve, place a pile of rice noodles into a bowl. Top with a portion of fish and some of the herb mixture. Sprinkle with peanuts, dress with the fish sauce dressing, and add hot sauce as desired.
Wednesday, August 6, 2014
Fig Pistachio and Goat Cheese Danish

I have this theory that the bulk of electric items that malfunction do so because they are, on some level, either:
1. unplugged
or
2. dirty
Sure, I understand that there are a wealth of complex problems that afflict larger machinery (as my recent $1,600 car repair bill can attest). But when a bike light/toaster/mixer stops working, I find that if I unscrew the back plate, and then either blow out a clot of dust or reconnect some wires that are clearly no longer connected, nine times out of ten the thing will blink back into life. Its enough to give a girl a false sense of prowess. I can fix things! Okay, maybe I dont fully understand how a circuit works, but still! I can fix things! Similarly, I have no culinary degree, and dont really understand the intricacies of pastry and what-have-you. But with a few small tweaks, I managed to come up with a breakfast creation that makes me feel like Ive got this whole cooking thing down backwards and forwards. I can fix breakfast!
To be clear, Im not usually a big fan of figs. Or so-inviting-yet-so-often-one-dimensional-and-disappointing sticky buns. Yet somehow, I bravely soldiered through these twin adversities and came up with a sweet figgy breakfast that is crazy good: the fig, pistachio and goat cheese danish.
Figs have a lot going for them. Namely, they grow all over Portland, plopping down on sidewalks (or, in this case, your neighbors yard), free for the taking. And theyre beautiful, especially the Adriatics, with their light green skins hiding comically bright fuscia centers. But flavor-wise? Meh. As someone who always likes a bit of punch to my desserts (well, to all my meals, really), figs are just a bit too one-note for my tastes. Theyre all syrupy sweetness, no citrus sourness or berry brightness or appley snap. But luckily, these problems can be solved. With pistachios and goat cheese.
Instead of the stales-within-minutes standard sticky bun dough, I started off with a rich danish dough instead (I used Nigella Lawsons brilliant cheater method, which is really just an easy combination of cutting butter into flour like pie crust, and then mixing in a yeasty, eggy slurry and giving the results a few turns). After folding and rising (you can stretch this out between a few days), you roll it out and spread on a rich-and-nutty-but-not-too-sweet pistachio paste, crumbles of tangy goat cheese, and those figs. The end result is perfect: the sweetness of the figs kept from becoming too cloying by the slight sourness of the goat cheese and the buttery, yeasty lightness of the dough. The pistachio paste keeps everything rich and creamy without overwhelming, and the figs are also just plain pretty. Yes, Ill acknowledge that creating this recipe didnt really take too much specialized knowledge — I just unscrewed the back plate off the standard sticky bun, and connected it with some of my favorite flavor (and, if were being honest, color) combinations. But the end result is so good, Id swear I actually knew what I was doing.

Fig, Pistachio and Goat Cheese Danish
yields 12 danish
dough adapted from Nigella Lawsons How to be a Domestic Goddess, the rest of the bad ideas are my own
The danish dough isnt difficult to make, but it does take time, between the cutting and folding and rising. You can divide the stages across several days, or double the recipe, and then freeze half of it to thaw out at a later date.
The danish dough isnt difficult to make, but it does take time, between the cutting and folding and rising. You can divide the stages across several days, or double the recipe, and then freeze half of it to thaw out at a later date.
For the pastry:
3/4 cup milk
2 tsp active dry yeast
1 large egg, room temperature
2 1/4 cups flour (I like a split of 2 cups white flour, 1/4 cup whole wheat flour)
3 Tbsp sugar
1 tsp salt
2 sticks unsalted butter, cold, cut into pats
Filling:
3/4 cup shelled raw pistachios (you can use roasted if thats all you can find, but the subtler flavor of raw works a bit better)
2 Tbsp sugar
1/2 stick butter, softened to room temperature
1 Tbsp flour
1 egg
pinch salt
splash rosewater (optional, but adds a nice perfume)
1/4 cup crumbled goat cheese 6 large figs — cut 4 into a small dice for the filling, and the remaining two into slices for garnishing the top
1 egg, beaten with a splash of water (aka the egg wash)
coarse sugar
In a small bowl, mix together the milk, yeast, and egg. Let sit for a few minutes for the yeast to soften.
In a food processor or large bowl, mix together the flour, sugar and salt. Add the butter, and pulse or press with the heel of your hand until the butter is reduced to 1/2" pieces (you dont need it quite as well-mixed as for a pie crust). If using a food processor, transfer to a bowl at this point. Add the yeast mixture, stirring until its well-combined (itll be a fairly goopy mass with lumps of butter — dont fret!). Cover the bowl, and refrigerate overnight or up to four days (if the latter, you might need to punch it down to deflate every day or two if its rising a lot).
To turn the dough into pastry, remove the dough from the refrigerator and let it come to room temperature. Dust a work surface with flour, and turn the dough out onto it. Roll until it forms a rectangle, about 18" in length (no worries about being terribly precise). Fold into thirds, like a business letter, then rotate 90 degrees. Repeat the process three more times — the clumps of butter will roll out into nice long flakes, and the dough will begin to become more cohesive and dough-like. Cover and let rest half an hour (you can also re-refrigerate for another day or two at this point if needed).
When youre ready to assemble the danish, line an 8-inch square pan with parchment and make the filling. Place the nuts and sugar in a food processor, and process until reduced to bits. Add the butter, flour, egg, salt and rosewater, and process until it forms a relatively smooth paste (scraping down the sides of the mixer as needed).
Roll the dough out into a rectangle about 18" in length. Spread with the pistachio filling — go right up to the short side edges, but leave about 1/4" on each long edge. Sprinkle the chopped figs and crumbled goat cheese, then roll the long side in and pinch to seal. Using a sharp knife, cut the roll into 12 equal pieces. Place the pieces, with either swirled cut side up, into your prepared pan (you may need to squash them down slightly). Top each roll with one of the fig slices. Let sit for ~30-40 minutes to rise (they will have some space between them, but that will be filled in as they rise and then bake).
While the Danish are rising, preheat your oven to 375° Farenheit.
When the Danish are slightly risen, brush with the egg wash, and sprinkle generously with coarse sugar. Bake until browned, ~20-25 minutes.
Friday, August 1, 2014
Grilled Corn Dressing and Dip

Salad dressing isnt usually one of those things that cries out for innovation. While my salad vegetables vary a bit with the seasons (and shopping trips), the dressing remains pretty much the same. Oil, vinegar, shallot, salt, pepper, a pinch of sugar. Thats it. This formula allows room for variation: olive oil and red wine vinegar for an Italian meal, or walnut oil and sherry vinegar if youre feeling fancy. Sometimes theres a pinch of tarragon for excitement, or a few curls of orange or lemon zest when Ive got citrus. Now and then garlic steps in for the shallot, or maple syrup for the sugar. But the standard dressing formula holds strong.
Except when it doesnt. Every once in a while, especially when there have been a lot of salads on the menu, the standard vinaigrette can feel a little tired, and I want to branch out. Our resident lactard rules out the buttermilk-based creamy dressings that call out to me. So instead, I turn to corn.
It sounds a bit strange at first, and Ive even faced doubters in my own kitchen ("Were having salad topped with chowder?"). But this recipe wins hearts and minds. Its creamy without the cream, and has a smoky sweetness from the grill (and if you dont have the time or inclination to grill, you can fake it with smoked paprika and a pinch of sugar). It also makes a great dip for vegetables, and is absolutely heavenly poured over sliced avocados.
And for those of you wondering about the Wild America shots of prepared dishes in their natural backyard habitats? I dont really have a good answer. Our kitchen doesnt have much natural light, and is often pretty messy to boot. I figure Ill take advantage of the pretty before the rains set in.

Grilled Corn Dressing (and Dip)
inspired by my friend Sarah
makes about 1 1/2 cups dressing
2 ears corn
1 large shallot, roughly chopped
2 Tbsp rice wine vinegar
pinch each smoked paprika and sugar (optional, see instructions)
1/2 - 3/4 cups olive oil
salt and pepper to taste
Grill or boil the corn until done. Shuck any remaining husk, and cut the kernels off of the ears. This will yield ~1 cup kernels.
Place the corn kernels in a blender, along with the rice wine vinegar and shallot. If you boiled the corn, add a pinch each of the smoked paprika and the sugar (grilled corn will have enough smoky sweetness on its own). Add about half the oil and puree until somewhat smooth. Continue to add more oil, stopping when you have a pourable consistency. Adjust seasonings to taste.
Thursday, July 31, 2014
Sweet Corn and Blackberry Popsicles

People often look back on the food of their youth with nostalgia, wondering why things just never taste as sweet in adulthood. While I have my fair share of misty culinary memories (many of them involving pressing cinnamon candies into sugar cookie dough to yield vampiric-eyed barn animals), I must say that many things taste better these days. Like corn.
When I was growing up, corn was prepared one way: boiled. For a long, long time. After this prolonged bath it was wrinkled, starchy, and didnt taste like much of anything (beyond the generous amount of butter and salt it was topped with, so naturally I still loved it). It wasnt until years later that I realized how good fresh corn could be. Or maybe corn just got better? I hear theyve made some progress with the whole keeping-sugars-from-converting-to-starch-within-seconds thing. Regardless: fresh corn, when cooked lightly (or not at all), is a thing of beauty. Its sunny, light, and fresh-smelling, and nearly pops in your mouth with milky sweetness.
These days I cant get enough of fresh corn. Ive baked it up into tomato pies, and shaved it into a raw salad with arugula, radishes, feta and mint (which I sadly forgot to photograph before inhaling). Both were lovely. But these popsicles might be my favorite. They were born somewhat by accident: I needed a cup of half-and-half for a recipe, and the quart was on sale for the same price as a half-pint, which meant that my thrifty self couldnt not buy it. The sweet corn at the farmers market was calling out, and the blackberries in front of our house had turned dark and sweet. And thus, creamy sweet corn and blackberry popsicles. And I daresay theyre perfect.
The corn, barely cooked and infused into half-and-half, is total summer sunshine. Its sugars, which are normally just a background note, come straight to the forefront, yielding a corny-sweet riff on a standard summer confection. The melty popsicles are thick and smooth, the blended milky corn lending a richness that you usually get from an eggy custard. And to keep the buttery sweetness of the corn from becoming overwhelming, its studded with a tart mash of barely-sweetened blackberries. While many people will be firing up the barbecue to enjoy their corn this Labor Day, I lobby for the popsicle instead.
Sweet Corn and Blackberry Popsicles
yields ~ 4-5 standard (3 ounce) popsicles
2 ears sweet corn
1 1/2 cups half-and-half
1/3 cup sugar, plus additional for the blackberries
1/4 tsp salt
1/2 tsp vanilla
heaping 1/2 cup blackberries
Cut the kernals off of the cob, and place in a saucepan. Hack the cobs up in a few pieces, and add them as well, along with the half-and-half, 1/3 cup sugar, and salt. Bring the mixture to a simmer for a minute or so, until the corn softens and turns a darker yellow. Turn off the heat, add the vanilla, and let the mixture steep for an hour, transferring to the refrigerator as it cools (you want to wait a minimum of an hour to let the mixture infuse, but you can shelve it in the fridge for longer if needed).
While the corn mixture is steeping and cooling, rinse the blackberries and mash them with a fork or potato masher. Sweeten to taste with a spoonful or two of sugar -- the corn mixture will be sweet as well, so you want the blackberries to be a bit tart for contrast.
After the corn mixture has steeped, fish out the cobs and discard. Puree the remaining mixture in a blender, then strain through a fine sieve (you may have to clear the strainer a few times to get rid of the corn solids). Place the corn mixture in a container with a spout, and pour an inch of it in the bottom of your popsicle molds. Top with a spoonful of the sweetened blackberry puree, then repeat the process until the molds are filled (leaving enough headspace for them to expand). If you have the kind of molds with stick handles attached, simply freeze until solid. Otherwise let freeze half an hour, insert popsicle sticks into the semi-frozen mixture, and freeze completely.
Subscribe to:
Posts (Atom)