Friday, July 11, 2014
Garlicky Breakfast Fried Rice

There are some leftovers that you choke down, out of a sense of responsibility and thrift. And then there are some leftovers that are better than the original. Garlicky fried rice, topped with a fried egg, is one of my favorite things to do with leftover rice the next morning. And although I used the word "fried" twice in the previous sentence, this isnt the traditional hangover greasebomb breakfast. Yeah, its got some oil, but its rich and savory from the garlic, tangy with hot sauce and cilantro, and sauced with a runny fried egg (if youd like). On second thought, maybe it is good for a hangover.
Im not entirely sure how and when I came up with the current version of this dish. I had the Sundays at Moosewood Restaurant cookbook years ago, which has an ethnic/regional focus. In the Southeast Asian section, the author said that a breakfast of garlicky fried rice topped with a fried egg and vinegared chiles took him back to the Philippines like nothing else. I think I might have started there, but quickly moved into a more Mexican adaptation.
My current version uses an ingredient that might not be in your pantry: achiote. Also called annatto, theyre the seeds of a tropical plant. You can find them in Latin American or Asian markets. Even if youve never cooked with them, youve probably eaten them many times: annatto is used to dye everything from orange cheddar to red-coated roast pork. In home cooking, the hard seeds are heated with oil at the start of a recipe, and then removed. The achiote-scented oil contributes a slightly peppery, nutmeggy fustiness to the finished dish. But you can certainly make this dish without it. I havent done a side-by-side comparison, but I think its subtle enough that you wont miss it, especially with everything else going on in this dish.
The recipe below is just a loose outline -- the actual dish tends to vary greatly depending on the contents of my refrigerator. Ive made it with short-grain rice, long-grain rice, white and brown. All work well (I think Im partial to fragrant basmati, but brown rice makes me feel a wee bit more virtuous). I toss cubed avocado on the top when Ive got it, or stir in shredded cheese at the end when I want a particularly gooey variation. However you make it, just make it.

Garlicky Fried Breakfast Rice
Serves 2
Like most fried rice made by those who dont have industrial woks, this might stick somewhat to your pan. Just work over a hot flame, frying as quickly as you can. Cast iron seems to work best.
1 Tbsp olive oil
1/2 tsp achiote seeds
1 large (or 2 small) cloves garlic
1 small tomato, chopped (optional)
2 cups leftover rice, somewhat dried out
2 heaping tablespoons chopped cilantro
salt and pepper
2 eggs
lime wedges and hot sauce for serving
Place the achiote seeds and oil in a heavy skillet, and heat over a medium flame. As the oil warms, it will take on color from the seeds. When the oil is very hot (but not smoking) and reddish from the achiote, fish the seeds out and discard them.
Drop the chopped garlic in the hot red oil, and stir quickly as they sizzle. Turn the flame up if needed. When theyre lightly browned, add the tomato and fry until the heat comes back up and the tomato softens but doesnt break down (barely a minute or so). Add the rice and cilantro. Stir frequently with a spatula or spoon, breaking up the rice clumps and coating each grain with the garlicky red oil (without mashing them too much). Season to taste with salt and pepper. When the rice is well-oiled and heated through, remove to two plates.
Quickly fry the eggs as you like them, and slide one on top of each plate of rice. Season with a few shakes of hot sauce, a squirt of lime, and additional salt and pepper.

Thursday, July 10, 2014
Orange Fromage Dessert Appelsinfromage Opskrift A Classic Danish Orange Mousse Dessert Recipe
This refreshing & delicious dessert is served cool. This homemade dessert is great to serve to your friends and family anytime of the year!
Ingredients:
Read more »
Ingredients:
- 4 pasteurized eggs that are separated
- 1/2 cup of sugar
- 2 cups of freshly squeezed orange juice
- finely grated orange zest from one orange
- 1 cup of whipping cream (including some for garnish)
- 1 tablespoon of unflavored gelatine
- 1/2 a cup of water
- measuring cup
- measuring spoon
- knife
- spatuala
- wooden spoon
- electric mixer
- cutting board
- 1 small mixing bowl
- 2 medium size mixing bowls
- 1 large mixing bowl
- 1 medium pot
- Whip 4 egg yolks with a 1/2 cup of sugar in a large mixing bowl. Whip until it is a light white-yellow in color and fluffy.
- Mix 1 tablespoon of gelatin into a 1/2 cup cold water in a small mixing bowl. Stirring constantly to make sure the gelatine dissolves.
- Next heat up the orange juice in a medium pot on high heat on the stove. Remove from the stove and add the dissolved gelatine. Stir constantly to ensure the gelatine is dissolved. Then, let the mixture cool for at least 10 minutes.
- Next whip the 4 egg whites in a medium size bowl until stiff. Set aside
- Whip the whipping cream with the electric mixer in a medium size bowl. Set a side
- Combine the orange juice mixture and orange zest into the egg yolk mixture in a large mixing bowl. Make sure the orange juice is cold before doing this.
- Then, fold in the whipped egg whites into the egg yolk mixture with a spatula.
- Fold the whipped cream into the egg mixture one forth at a time. (Leave about 1/4 cup of whipped cream on the side for decoration later.) Stir gently until it starts to thicken.
When the orange fromage is almost stiff, spoon into either a serving bowl or individual glasses. If you want to kick it up a notch, create an orange into an individual serving bowl.
To create an individual orange bowl
Using a sharp knife, cut an orange in half. Then remove the inside of the orange by scooping out the flesh. You now have a bowl made out of orange peel to use for the orange mousse. Now spoon in the orange fromage to the rim of the orange peel.
Keep either the serving bowls, individual glasses or the orange bowls in the fridge until ready to serve. Decorate with additional whipped cream. Add either an thin slice or orange peel, fruit or chocolate on top before serving. This is a fun and tasty way to present the orange fromage dessert! Chill for several hours or until firm.
Wednesday, July 9, 2014
Hamantaschen
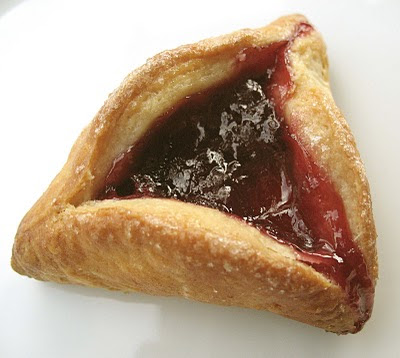
We expect a lot from hamantaschen. These triangular jam-filled cookies are baked by Eastern European Jews to celebrate the Purim holiday. In addition to triggering a dose of nostalgia, these cookies are expected to maintain their neat shape and hold back a river of delicious jam, all while showcasing a tender, delicate crumb. This is a lot to ask of any cookie. Hamantaschen seldom live up to the task. Most often (especially when made commercially) they err on the side of structure, holding a beautiful shape but having the dry, chalky mouthfeel of a wad of clay. Alternately, there are tender, pastry-light hamantaschen made with cream cheese doughs, but they unfurl disappointingly in the oven, shrugging off their three corners to settle back into the circle from which they were shaped.
Luckily, its possible to make hamantaschen that have both a traditional shape and a inviting texture. But it takes a bit of fussing. First off, the dough. If you want a rich and light cream cheese dough (and, trust me, you do), you need to give it a few cold rests. First the dough needs to chill in the refrigerator after you make it, so that the moisture can be absorbed without needing additional flour, and the soft butterfats can firm up. And once you shape the cookies, you want to chill them again, this time in the freezer for at least an hour. When the frozen cookies hit the oven, their icy stiffness will help them to bake and firm before any melty backsliding begins. And then theres the shaping. An egg wash is brushed on the dough, to help glue the mess together. The sides are then folded in -- but you dont want upright 90 degree walls, which can open easily. Instead, you want to ease the sides of your triangle into nice acute angles, encasing the jam so that just the tiniest jewel-like bit is peeping out of the center. A bit of twisting on the overlapping sides doesnt hurt either. Like I said, its a bit of fuss.
So why go through all the bother? Well, the same reason you cook anything, I suppose. To create something delicious, that connects you to the generations who have made it before, but also transports you on flavor and flakiness alone. These hamantaschen take some attention, and despite your best efforts might still unroll a bit in the oven (I lost 2 in a batch of 16, which seem like acceptable odds to me, especially after a rather flaky-yet-disastrous first pass). But the end result? The best hamantaschen Ive ever had.


Hamantaschen
inspired by several sources, most notably the Trois Pommes Patisserie, as reprinted in New York Magazine
yields 14-18 cookies, depending on size and thickness
1 stick butter (4 oz), softened to room temperature
4 oz cream cheese, softened to room temperature
1/2 tsp vanilla
1/4 tsp salt
3 Tbsp sugar
zest of 1/2 orange and 1/2 lemon (optional, but nice)
1 1/4 cup flour
1 egg, beaten with 1 spoonful water, milk or cream (henceforth referred to as the "egg wash")
~1/2 cup jam of your choose (I used the apricot and rosemary plum jams from my larder)
a few spoonfuls granulated sugar
Cream together the butter and cream cheese until well-combined and fluffy. Add the vanilla, salt, sugar, and citrus zest, beating until combined. Add the flour, and mix gently until the dough just comes together (try not to over-mix). Form the dough into a chubby disc, wrap in plastic or waxed paper, and refrigerate for at least an hour (preferably at least two).
When the dough has chilled and relaxed, roll it out onto a lightly-floured surface until it is between 1/8" to 1/4". Cut out circles with a 3" cutter. Place a teaspoon of jam in the center of each circle, and brush the edges with the egg wash. Shape each circle into a triangle, drawing the sides well over the top so that just a bit of the jam is peeking through (an area smaller than a dime) and sealing the edges. If possible, bring one of the edges slightly over the other, rolling it so that the seam is no longer on top. Place the shaped cookies on a plastic- or parchment-coated plate, and place in the freezer for 1 hour. Place the remaining egg wash back in the refrigerator.
Preheat the oven to 350 degrees farenheit.
Remove the cookies from the freezer, and place on greased or lined cookie sheets. Brush the top sides of the dough with the egg wash, and sprinkle lightly with the granulated sugar. Bake until they are nicely browned, 20-30 minutes. Let cool on a rack, and enjoy.
Tuesday, July 8, 2014
Red Lentil Walnut Burgers

When I look back on my college days, there are many things that I cant help but miss. The lack of responsibility, for one, when your only real job is to learn (well, also to scrub trays in the dining halls, and babysit local children who laugh at your hair, but Ive tried to forget most of that). Theres the sense of potential and common purpose, and the sweet delaying of adult decisions. But more than anything else, theres this: dozens and dozens of friends, many of them living right down the hall. You dont even need to put on shoes. If I had known how rare that was in the grown-up world, I might never have left.
In the grown-up world, friendships can be a bit more difficult. Your nearest and dearest are often busy with their own work woes and family obligations, and at best might live on the other side of the neighborhood (at worst, the other side of the world). So I know how lucky I am to say this: the only thing separating me from some of my favorite people in town is a shared driveway.
It took us a while to broach the usual neighborly anonymity. But our kitchen windows face each other, and lord knows I spend a lot of time in the kitchen. If youre doing dishes, its impossible not to be staring into the facing window. So after several weeks of watching each other prepare separate meals, we proposed sharing dinners. Which has further developed into sharing living-room happy hours, next-door grocery runs, and a rudimentary through-the-window sign language (mostly used to gauge whether or not to shake up an additional cocktail). On the sad sad day when were no longer living in slipper-wearing distance of each other, Ill have many fond memories to look back on. And Ill have the recipe for red lentil walnut burgers.
My neighbor happened upon this recipe several months ago, and it entered her regular rotation after a bit of tweaking (swapping oatmeal for breadcrumbs, and red lentils for brown). These healthy patties freeze wonderfully, and we both regularly make double batches to have on-hand. The spicing yields a flavor reminiscent of falafel, but with less grease and a smoother texture. Weve crumbled them in pita bread with tahini, and topped them with kraut and russian dressing like a reuben (as well as enjoying them with traditional burger condiments). The combination of lentils, oats and walnuts makes them especially heart-healthy. Of course, Id take a stellar neighbor over a delicious vegetarian burger any day of the week. But for now, I get to enjoy both.

Red Lentil Walnut Burgers
adapted from PBSs Everyday Food
yields 4 burgers
These patties reheat wonderfully, but not in the microwave for some reason (which tends to dry them out in a strange and unappetizing way). Allot a bit of extra time to warm and crisp up leftovers in a skillet or toaster oven.
3/4 cup red lentils
3/4 cup toasted walnuts, cooled
1/2-1 cup rolled oats
3 garlic cloves, minced
2 tsp ground cumin
2 tsp ground coriander
1/4 - 1/2 tsp chili flakes
1 tsp salt
1 Tbsp olive oil
1 large egg
2-3 Tbsp oil for frying
Rinse the lentils, and place them in a pot with 1 1/4 cups water. Bring to a boil, then reduce the heat until its just high enough to maintain a simmer. Cover and cook until tender, ~20-30 minutes. Check every now and then, adding more water if needed. Let cool.
In a food processor, combine the cooked and cooled lentils, walnuts, oats (start with the smaller amount), garlic, cumin, coriander, chili flakes, salt, olive oil, and egg. Pulse until combined but not totally mushed (having little chunks of walnuts and oats will make the texture more interesting). Turn out into a bowl, and knead for a moment to evenly distribute the ingredients. Let sit ~5 minutes for the oats to absorbthe moisture. Divide into 4 pieces, and shape into patties that are about 3/4" thick. If the mixture is too moist to shape (it should be fairly moist, but not ridiculously so), add additional oats, waiting 5 minutes after each addition.
Heat a few tablespoons oil over medium-low heat in a large skillet. Add the burgers. Cook until crisp and browned, 8-10 minutes per side. The burgers will be very delicate while warm, so turn gently (theyll firm up a bit as they cool). Serve with the condiments of your choice.
Monday, July 7, 2014
Best Vegan Brownies

Nearly a decade ago, I briefly considered going vegan. And it pretty much began and ended with a pan of brownies. I dont remember the ideological tipping point, but I do remember buying a round of vegan groceries to prepare for this new phase. I found a recipe for vegan brownies, blitzed some silken tofu in the food processor, and set out to prove that vegan desserts could be delicious. The resulting brownies were terrible. So terrible that when my housemate ate some, she didnt ask what was wrong with the brownies. She just asked what were those? The tofu created a gelatinous texture, so that they werent even identifiable as members of the brownies species. Just some bouncy, chocolate-soy concoction. Terrible. On my next shopping trip, I bought some butter.
To be fair, Im something of a snob when it comes to brownies. I like them dense and fudgey, and full of deep chocolate flavor. No soy aftertaste, no dry cakiness. Just brownies. With a dairy-free boyfriend and a handful of vegan friends, Ive certainly experimented with my share of butter-free baking. Ive found delicious vegan chocolate cookies, and a sophisticated dairy-free olive oil rosemary cake. But brownies have remained off the menu. At their fudgey best, brownies are essentially just butter, eggs and chocolate, with a bit of flour to bind and sugar to sweeten. How do you veganize that?
Amazingly, theres a way. The secret to great vegan brownies? Vegan ice cream! Some pioneering vegan had the brilliant idea to melt some vegan ice cream to use as the liquid portion, taking advantage of its thickeners and binders to add luscious fudgey body to the finished brownies (because unless youre gluten-free to boot, you probably dont have xantham gum and other such items lying around your kitchen). Theres no troublesome margarine either (which has a tendency to add an off flavor and oily finish when subbed for butter), just a splash of oil. I tinkered with the recipe a bit, refining the technique, increasing the salt, and reducing the amount of leavening and the cooking time to increase the fudginess. The resulting brownies? They actually taste like brownies. Like great brownies.

Best Vegan Brownies
adapted from this recipe
yields an 8" square pan
Chocolate soy ice cream gives these an extra chocolatey oomph, but vanilla also works. I used a mint chocolate marble we had in the fridge, which nicely complemented the flavors.
3/4 cup flour
1/4 cup cocoa powder
1/2 tsp baking powder
1/2 tsp salt
1/2 cup melted soy ice cream (the volume will reduce as it melts, so start with a little more than half a cup)
1/4 cup vegetable oil
3/4 cup sugar
1 tsp vanilla
1/4 cup chocolate chips or chopped chocolate (optional)
1/4 cup chopped walnuts (optional)
Preheat the oven to 350 degrees. Grease and flour a 8" square brownie pan.
Sift together the flour, cocoa powder, baking powder, and salt. Set aside.
Whisk together the melted soy ice cream, vegetable oil, sugar and vanilla. Fold in the dry ingredients until just combined. Fold in the chocolate chips and walnuts, if using. Pour into your prepared pan -- the mixture will be somewhat thick, so use a spatula or your fingers to make sure the mixture is distributed evenly to the edges of the pan. Bake about 15-20 minutes -- the top should be set, but a tester should still have a bit of fudgey goo instead of set crumbs. Remove from the oven, let cool, and devour. Like most brownies, these are best when theyve set for at least an hour.
Subscribe to:
Posts (Atom)