Tuesday, July 15, 2014
Summer Salad with Peaches Haricot Vert and Feta
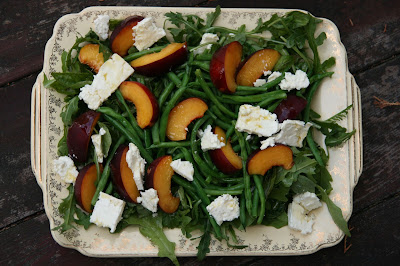
There are some combinations of flavors that just seem meant to be. Almost unavoidable, even. Tomatoes, basil and mozzarella. Peanut butter, bread and jam. Peaches, green beans and feta. And yes, I realize the latter triumvirate may not quote have the renown of the first two. It was something of a surprise to me, too. But such a delicious one.
I had the good fortune to climb over the fence earlier in the week and crash a ridiculously early dinner my neighbors were throwing in honor of some visiting friends. Tasked with bringing bread and salad, I swung by the market with some vague ideas. I considered several different ingredients (Baby zucchini? Pickling cucumbers?), trying to remember recipes Id browsed and pinned. But finally, I just settled on grabbing handfuls of the things that look most delicious on these warm summer days. The drippy-sweet and oh-so-fragrant peaches that have just appeared, a few handfuls of baby arugula, and the teensy haricot vert green beans. I picked up some creamy French feta, and a handful of the starting-to-wilt-but-still-totally-usable basil in the back of my own refrigerator. And something great happened.
The green-green-green crunch of tender haricot vert somehow works perfectly with the sweet and juicy peaches (although I bet regular green beans would work in a pinch). Arugula and basil give a spunky herbal edge against the sweetness, and creamy, briny feta ties it all together. I added a simple vinaigrette, with an extra dollop of honey and not too much sour. Since this happy discovery, the salad has already made an encore performance (youre welcome, book club!), and I aim to recreate it at least once more before the season ends. Because really, you cant argue with a meant-to-be combination like this one.
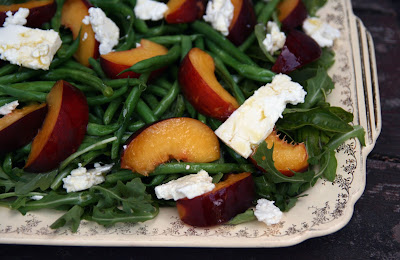
Summer Salad with Peaches, Haricot Vert and Feta
serves ~10 (this was for a potluck — can easily be halved)
~ 2 cups haricot vert (aka small & skinny green beans), any hard stem ends snapped off
1 produce bag of baby arugula
a few handfuls basil leaves (torn if large)
3-4 ripe peaches, sliced into slim wedges
~1/3 pound creamy feta, such as French or Israeli, cut into thin slabs (theyll crumble, but thats fine)
Dressing:
juice of 1 lime
1/2 cup olive oil
1 tablespoon honey
2-3 teaspoons mild vinegar, such as sherry
salt to taste
Bring a pot of salted water to a boil. and have a strainer in the sink, and large bowl of ice water at the ready. When boiling, add the green beans, and cook until they turn a brighter green and just begin to become tender (this will only take a minute or two). When theyre done, dump them out into a strainer, then plunge into the ice water to stop the cooking. Let them sit there a few minutes until cool, and then drain.
To assemble the salad, place the arugula onto a super-large bowl or platter (or two reasonably large ones). Top with the basil, beans, peaches and feta.
Place the dressing ingredients in a jar with a tight-fitting lid (like a canning jar), and shake until emulsified. Taste and adjust seasonings as needed. Pour over the salad, and serve.

Monday, July 14, 2014
Porrusalda Basque Potato Leek Soup

There is something of a debate about cooking technique that occasionally rears its head in our house. On the one side, there is the practice of long, slow cooking. Soups and sauces are simmered for several hours, developing surprisingly deep flavors and smooth textures. On the other, theres the desire to cook fast and furious over high heat, and take the soup pot off the stove because come on its done enough and Im really hungry! Im embarrassed to say that I represent the latter camp.
Whenever I manage to quiet my impatient grumbling and let something simmer for the alloted time, Im usually floored by the results. This soup is an especially good example of the startling transformation that can be achieved through slow cooking. As in much of Basque cooking, the emphasis isnt on a handful of spices or flashy additions, but on a careful treatment of fresh vegetables. The ingredients are as humble as they come -- just a handful of root vegetables and some water -- but the resulting soup is full of flavor.

Porrusalda (Basque Potato Leek Soup)
as interpreted by Iñaki Guridi
yields one large pot
Traditionally, the potatoes arent cut with a knife, but broken into rough-edged pieces that release more starch to thicken the soup. To do this, slide a paring knife halfway through a peeled potato, about 1.5" down. Press the potato between your thumb and the knife, and twist to free a chunk roughly 1.5" square (although, of course, it wont be square). Repeat until the whole potato is reduced to rough chunks.
2 Tbsp olive oil
1 clove garlic, sliced into thick rounds
3 waxy red or yellow potatoes, peeled and broken into chunks (see note above)
4 leeks, washed and sliced into 1" rounds
4 large (or 6 small) carrots, peeled and sliced into 1/2" rounds
water to cover
salt to taste
Heat the olive oil in a large heavy soup pot over medium heat. Add the garlic and potatoes, and saute for a few minuts. Add the leeks and carrots, and saute for another minute. Add water to cover by 1", and a bit of salt. Bring to a boil, then reduce the heat to a simmer. Simmer, covered for about 2 hours (or, ideally, longer), stirring occasionally. Season to taste with additional salt.
Sunday, July 13, 2014
Vegetarian or not Stuffed Cabbage

Usually Portlands temperate climate is pretty inviting. Sure, we get rained on in the winter. But other parts of the country get blizzards. At least when the clouds part here, its fairly balmy. Well, usually.
Recently it looks like the rest of the country is warming up to spring. But here in Portland, weve been getting dumped on by daily rainstorms, and the ground has sogged up to a muddy sponge. Its like its winter or something, I keep telling friends (to nobodys amusement). Our downtown farmers market just opened for the season yesterday, but Im not really thinking about tender green shoots. Im thinking about stuffed cabbage.
I never liked stuffed cabbage all that much as a kid, mostly because Id only tasted versions that played up the sweetnsour Eastern European flavoring a bit too much (Im of the firm opinion that meat and raisins should never play together). But a few months ago I was filling up a friends freezer during a visit, and figured stuffed cabbage would be a great dish for cold storage. I came across a lovely version from this lovely blog, which lightens up the filling with sweet and earthy carrots and parsnips. I made a beefy version that my friend loved, and have since twice made it vegetarian by swapping some faux chicken for the meat. Its a great veg-packed all-in-one meal, and does a lovely job of getting you through the last soggy days of winter.


Vegetarian (or not) Stuffed Cabbage
yields 1 large tray (the exact number of rolls will vary, depending upon the size of your cabbage)
adapted from Smitten Kitchen, but baked instead of simmered, green instead of savoy cabbage, and a different sauce
1 large head green cabbage
2 Tbsp olive oil
1 onion, finely diced
1-2 carrots, shredded
1-2 parsnips, shredded
2 Tbsp tomato paste
1/2 cup rice, uncooked (or 1/2 cup brown rice, par-cooked for 20 minutes and drained)
1 lb beef, or grated vegetarian beef substitute (Ive used chicken-style patties to good effect)
2 cups tomato sauce or v8-style tomato juice
1 cup vegetable broth
1-2 Tbsp cider vinegar
1-2 Tbsp sugar
salt and pepper
Preheat the oven to 350 degrees. Prepare the cabbage by cutting out the core (without cutting into the leaves too much). Place in a large pot, and cover with boiling water. Let sit in the water to soften ~10-15 minutes (the cabbage will float, so try to spin it around a bit to ensure it all comes in contact with the water). Alternately, you can soften the cabbage by placing it in the freezer the night before and allowing it to thaw (the ice crystals will do enough damage to the cell walls that the thawed cabbage will be limp enough to work with), but I never think of this in advance.
Heat the oil over a medium flame in a large skillet. Add the onions, and saute until translucent and softened. Add the carrot and parsnip, and saute for another minute or two, until softened. Remove from heat, and season with salt and pepper (season a bit heavily if using beef, just to taste if using a pre-seasoned meat alternative). Add the tomato paste, rice and meat (or meat substitute).
Drain the cabbage, and pull off the leaves. If the center rib of any leaf is big and unwieldy, you can cut it out with a v-shaped slice (but this isnt necessary). Take a leaf, and scoop 1/4-1/3 cup filling in the center (the exact amount will vary based upon leaf size - no need to overstuff). Fold the sides of the leaf around the filling, and roll up the remainder. Place the stuffed leaf, seam side down, in a large casserole dish. Repeat with the remaining leaves and filling. If you have leftover leaves, you can chop them finely and scatter them over the top, although that sadly distracts from your neat little packages.
In a separate bowl, mix together the tomato sauce, broth, vinegar and sugar. Season to taste with salt and pepper, adjusting the vinegar and sugar as needed to make a sauce that is just a little bit sweet and tangy. Pour the sauce over the stuffed cabbage (you may need to wait a few moments to make sure it settles into all of the nooks and crannies, depending on how densely youve got them packed). Cover tightly with a lid or foil, and bake until the filling is set and the cabbage is totally soft, ~ 1 hour. Enjoy right away, or let cool and freeze.
Saturday, July 12, 2014
Gluten Free Crusty Seeded Bread

Good crusty bread seems to be the final frontier in gluten-free baking. Cupcakes and cookies certainly take a bit of skill and care, but if you have a good recipe (especially one with a lot of fat and sugar to do the heavy lifting), youll end up with something delicious. Sandwich bread needs to be able to stay together, sure, but usually theyre topped with enough flavorful ingredients and tasty spreads that by the end it doesnt matter too much. But a good, crusty hearth loaf? The sort of old-school, artisan boule with a toothsome crust and a rangy, airy crumb? For most gf people, these can be a sad, distant memory.
A good friend of mine recently went off gluten, and has been sorely missing these loaves. Before the dietary shift, gluten was a big part of her existence. She bought flour in 25-lb sacks, and on weekends would mix up a double batch of Jim Laheys famous no-knead bread, stud it with seeds, and bake the loaves up for the family to enjoy throughout the week. Its a pretty hard thing to say goodbye to.
But thanks to some amazing gluten-free bakers, you dont have to. The wonderful Jeff Hertzberg and Zoë Francois, along with Shauna James Ahern came up with a gluten-free loaf that does a shocking job of passing for its gluten-filled inspiration. A mix of several different gf flours, xanthan gum, eggs and oil combine into a a crusty, satisfying hearth loaf. In keeping with the tradition (and my own hippie leanings), I tossed a good handful of seeds into the dough, and scattered more on top. The results are amazing.
Would you mistake this for standard bread? Possibly. Its pretty darned close, Ill say. Although its definitely "bready," if you pay close attention you might find it a little more spongy, a little less rangy and airy than the usual hearth breads. In that way its similar to the spongier Italian semolina loaves, sort of a hybrid of that style and the leaner artisan boule. But mostly, its just good. Really really good.
 Gluten-free Crusty Seeded Bread
yields 1 2-lb loaf
Adapted from the Gluten-Free Crusty Boule in Jeff Hertzberg and Zoë Francois lovely book Healthy Bread in Five Minutes a Day
Things to keep in mind:
1) You will see the word "gently" appear in this recipe several dozen times. Gentleness is key, it turns out. While all unbaked doughs are somewhat delicate, gluten-free dough is especially so. If you handle it roughly after its risen, youll knock out those hard-earned air pockets, and lose your lovely texture in the finished product. A bit of babying will pay off mightily.
2) While youll want to tear into this bread right away, it continues to cook internally and set after removing from the oven. You break it open, you get gummy bread. So you must wait, sadly.
3) Many people with gluten intolerance are sensitive to even the smallest amounts of trace cross-contamination. If youre not gluten-free but cooking for someone who is, make sure you use clean, nonporous equipment and avoid any traces of gluten. If your Dutch oven has been used on other gluten-y meals, use a large enough piece of parchment paper to prevent the dough from coming in contact with the pot.
Bread:
1 cup brown rice flour
3/4 cup sorghum flour
1 1/2 cups tapioca starch
1 Tbsp xanthan gum
2 teaspoons coarse salt
1 1/3 cups water (slightly warm, especially if your rising area is cold, but not so warm that you kill the yeast -- just comfortably warm)
1 Tbsp active dry yeast
2 eggs
1 Tbsp plus 1 tsp neutral oil, like canola
1 Tbsp sugar
1/3 cup toasted pumpkin seeds
1/4 cup whole flax seeds
3 Tbsp toasted sesame seeds
Topping:
1 egg, beaten with 1 small splash water (aka "the egg wash")
3 Tbsp raw pumpkin seeds
2 Tbsp whole flax seeds
2 Tbsp sesame seeds
Mix together the rice flour, sorghum flour, tapioca starch, xanthan gum, and salt. Set aside. In the bowl of a mixer (or another large bowl), pour the water and sprinkle the yeast over it. Let sit for a few minutes to allow the yeast to soften. Add the eggs, oil and sugar, and mix thoroughly. Add the gf flour mixture, and mix thoroughly to combine. If youre using a mixer, use the paddle rather than the dough hook. Continue to mix together until the dough is well-combined and smooth. The dough will not seem like a traditional bread dough -- its somewhere between a cake batter and smooth mashed potatoes. Add the pumpkin, flax, and sesame seeds, and stir to combine.
When the dough is mixed, place it in a lightly-oiled covered container, and let sit, loosely covered, at room temperature for 2 hours. If your rising place is particularly warm, cut this down to 1 1/2 hours. After it has risen, gently take the container and place it in the refrigerator. Chill at least overnight, and up to about a week.
When youre ready to bake, gently take the dough out of the refrigerator. Tip it out onto a piece of parchment paper, taking care to not deflate any of the air that it has captured. Using a wet hand, shape the dough into a round, and smooth out the surface as best you can (keep wetting your hand to prevent the dough from sticking, and to wet the surface of the dough enough to smooth it out). Cover loosely with a piece of plastic, and allow to rise an hour and a half (less time if your rising area is warm).
Half an hour before the rising time is done, preheat your oven to 500 degrees. Place a large Dutch oven and its cover (making sure the cover doesnt have a meltable plastic knob) in the oven to preheat. While this is preheating, mix together the seeds for the topping.
When the dough has warmed and risen slightly, brush the surface completely with the egg wash (use a pastry brush if you have it, otherwise just wad up the plastic youd used to cover the dough, and use it to gently blot the surface of the dough with the egg wash). Sprinkle the seeds for the topping evenly over the surface. Take a sharp serrated knife, and gently cut slashes 1/4" deep over the surface of the dough.
Carefully remove the preheated Dutch oven from the oven. Gently pick up the piece of parchment paper around the loaf, and gently lower it into the preheated pot. Cover, and gently place in the oven. Let bake 25 minutes, then remove the lid, and lower the oven temperature to 450 degrees. Let bake an additional 20-25 minutes, until the surface of the dough is browned (it may be difficult to see under the seeds), and the dough seems done to your liking. Lift it out of the pan, and cool on a rack. When nearly completely cool, slice and serve.
Friday, July 11, 2014
Garlicky Breakfast Fried Rice

There are some leftovers that you choke down, out of a sense of responsibility and thrift. And then there are some leftovers that are better than the original. Garlicky fried rice, topped with a fried egg, is one of my favorite things to do with leftover rice the next morning. And although I used the word "fried" twice in the previous sentence, this isnt the traditional hangover greasebomb breakfast. Yeah, its got some oil, but its rich and savory from the garlic, tangy with hot sauce and cilantro, and sauced with a runny fried egg (if youd like). On second thought, maybe it is good for a hangover.
Im not entirely sure how and when I came up with the current version of this dish. I had the Sundays at Moosewood Restaurant cookbook years ago, which has an ethnic/regional focus. In the Southeast Asian section, the author said that a breakfast of garlicky fried rice topped with a fried egg and vinegared chiles took him back to the Philippines like nothing else. I think I might have started there, but quickly moved into a more Mexican adaptation.
My current version uses an ingredient that might not be in your pantry: achiote. Also called annatto, theyre the seeds of a tropical plant. You can find them in Latin American or Asian markets. Even if youve never cooked with them, youve probably eaten them many times: annatto is used to dye everything from orange cheddar to red-coated roast pork. In home cooking, the hard seeds are heated with oil at the start of a recipe, and then removed. The achiote-scented oil contributes a slightly peppery, nutmeggy fustiness to the finished dish. But you can certainly make this dish without it. I havent done a side-by-side comparison, but I think its subtle enough that you wont miss it, especially with everything else going on in this dish.
The recipe below is just a loose outline -- the actual dish tends to vary greatly depending on the contents of my refrigerator. Ive made it with short-grain rice, long-grain rice, white and brown. All work well (I think Im partial to fragrant basmati, but brown rice makes me feel a wee bit more virtuous). I toss cubed avocado on the top when Ive got it, or stir in shredded cheese at the end when I want a particularly gooey variation. However you make it, just make it.

Garlicky Fried Breakfast Rice
Serves 2
Like most fried rice made by those who dont have industrial woks, this might stick somewhat to your pan. Just work over a hot flame, frying as quickly as you can. Cast iron seems to work best.
1 Tbsp olive oil
1/2 tsp achiote seeds
1 large (or 2 small) cloves garlic
1 small tomato, chopped (optional)
2 cups leftover rice, somewhat dried out
2 heaping tablespoons chopped cilantro
salt and pepper
2 eggs
lime wedges and hot sauce for serving
Place the achiote seeds and oil in a heavy skillet, and heat over a medium flame. As the oil warms, it will take on color from the seeds. When the oil is very hot (but not smoking) and reddish from the achiote, fish the seeds out and discard them.
Drop the chopped garlic in the hot red oil, and stir quickly as they sizzle. Turn the flame up if needed. When theyre lightly browned, add the tomato and fry until the heat comes back up and the tomato softens but doesnt break down (barely a minute or so). Add the rice and cilantro. Stir frequently with a spatula or spoon, breaking up the rice clumps and coating each grain with the garlicky red oil (without mashing them too much). Season to taste with salt and pepper. When the rice is well-oiled and heated through, remove to two plates.
Quickly fry the eggs as you like them, and slide one on top of each plate of rice. Season with a few shakes of hot sauce, a squirt of lime, and additional salt and pepper.
Subscribe to:
Posts (Atom)